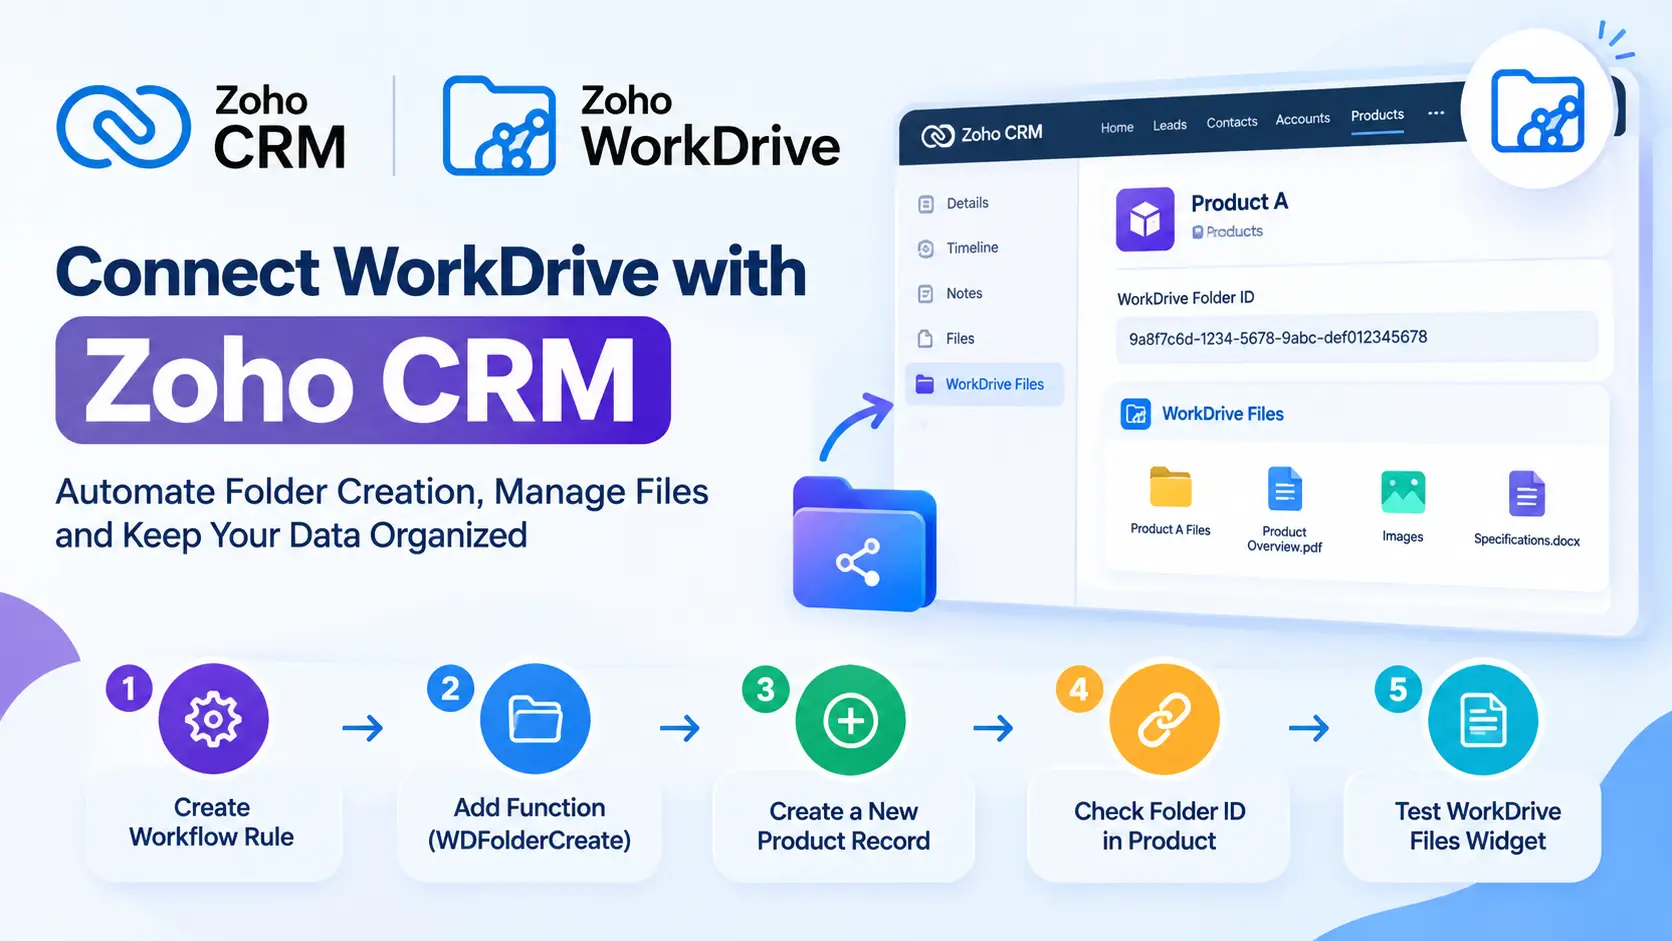
Adding the WorkDrive file manager to a custom module in Zoho CRM takes three things: you add the module in the extension’s settings, you create a workflow rule that makes the folder, and you install the WorkDrive Files related list on the record page. This guide walks through all three, in the order the screens actually appear.
Leads, Contacts, Accounts and Deals are configured for you the moment the extension is installed. A module you built yourself is not, and neither is a standard module the extension was not packaged for – Products, Quotes, Vendors, and so on. Those need the ten minutes below, once each.
If you set this up before version 9.0, the steps have changed. There is no longer a zip to download and no widget to create in Developer Space. See What changed in version 9.0 before you start, especially if you are looking at a widget you uploaded by hand last time.
Before you start
- You need to be a CRM administrator. Every screen in this guide is behind Setup or the extension’s own settings.
- WorkDrive In Zoho CRM 9.0 or later, and an active Zoho WorkDrive plan on the same account. You can check the version on the extension page.
- About ten minutes per module. Most of it is the folder-naming screen, and that is the part worth slowing down for.
- The main guide is a separate read. If the extension is not set up at all yet, start with How to set up and use WorkDrive in Zoho CRM and come back here afterwards.
What changed in version 9.0
Until version 9.0 this page asked you to do something genuinely awkward: download a Module Pack zip, create a widget under Setup › Developer Space › Widgets, get the Index Page field exactly right, and then re-upload that zip every single time the extension was updated. Miss one of those uploads and the file manager on your custom module quietly stayed on old code.
All of that is gone. The extension’s screens are no longer shipped inside the package – they are served from our own servers, so every org runs the same build and an update reaches you without anything to install. In place of the widget you used to create by hand, the extension now publishes one related list called WorkDrive Files that works on any module, and it creates that related list in your org automatically the first time you open the extension’s settings.
So the work left to you is smaller, and none of it repeats: tell the extension about the module, make the folder, put the related list on the layout.
Already have a hand-made widget on a module? It has not broken, but it is frozen – a widget in Developer Space serves whatever zip you last uploaded to it, and nothing will ever update that copy again. Add the WorkDrive Files related list alongside it, check it works, then remove the old one from the layout.
Why a custom module needs setting up at all
A Zoho Marketplace extension declares which modules it touches at the moment it is packaged and published – not later, when you install it. Your custom module did not exist when this extension was built, and no two orgs have the same custom modules, so there is no list it could have been added to in advance. That is a platform rule, not a gap in this extension.
What an extension can do is publish a general-purpose related list into your organisation and let you place it wherever you like. That is exactly what WorkDrive Files is. It reads the same settings and opens the same WorkDrive folders as the built-in panels on Leads or Deals; the only difference is that you decide which modules it appears on.
Step 1: Open the extension’s settings
In Zoho CRM go to Marketplace › Installed, find WorkDrive In Zoho CRM in the list, and click Settings.
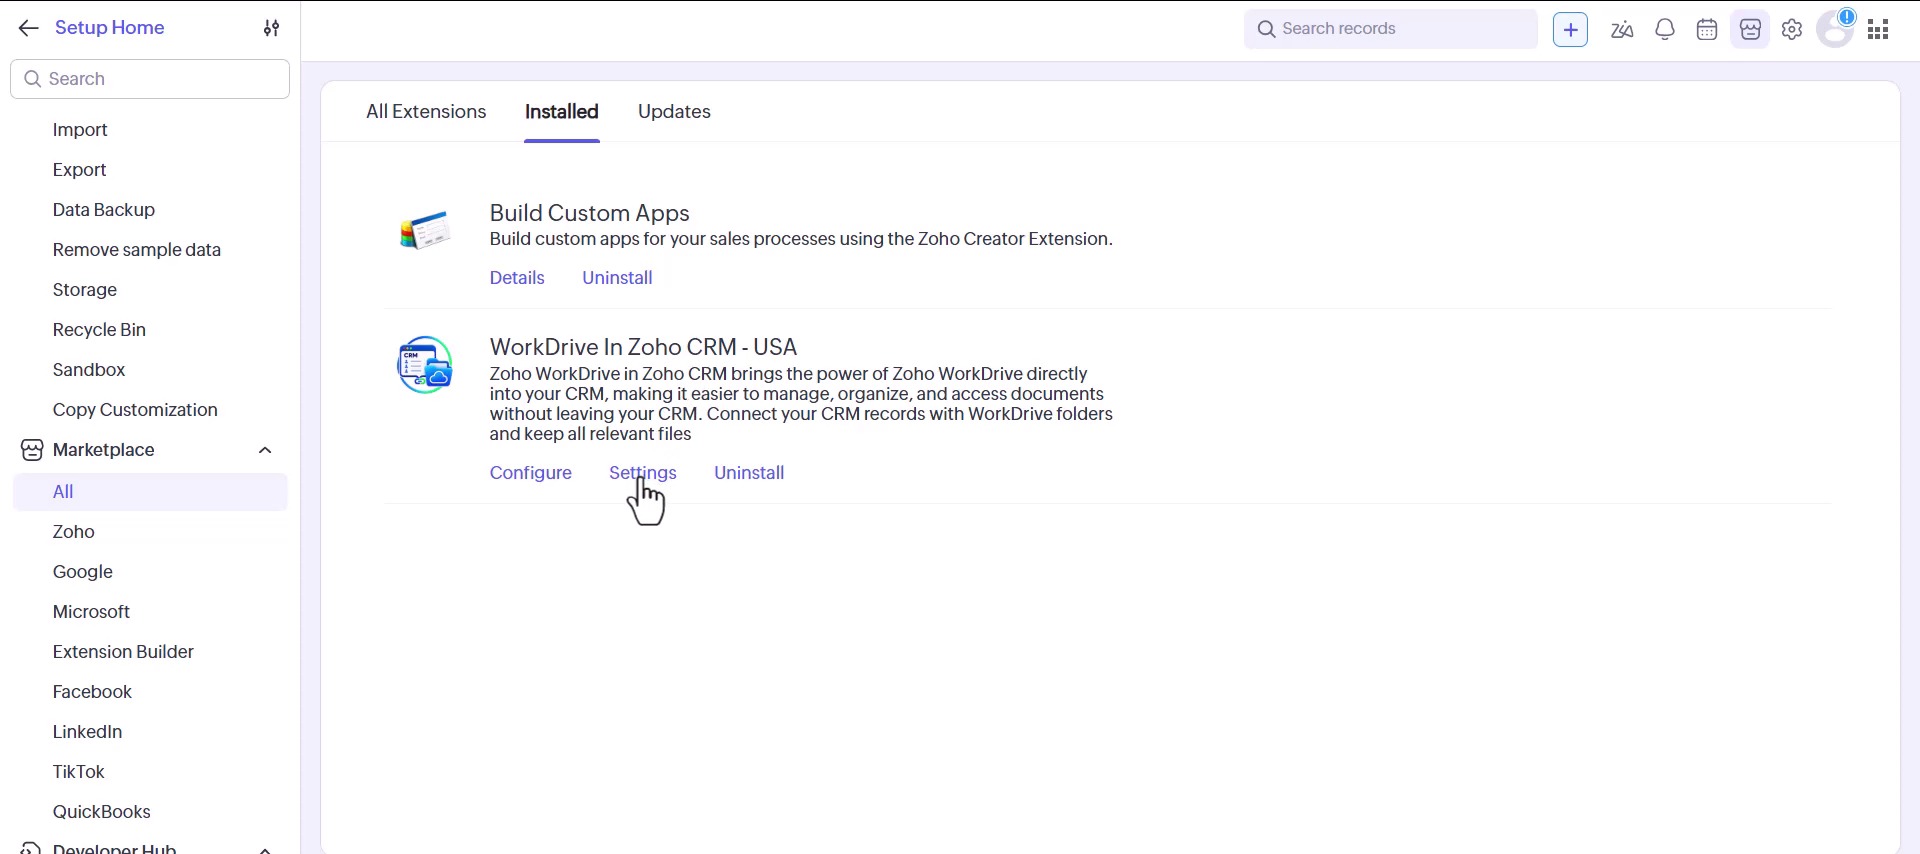
Do not skip this even if you think you know the rest. Opening Settings is what creates the WorkDrive Files related list in your organisation, and you will need it to exist in Step 6. Nothing on screen announces it; the settings page simply shows the related list as Ready once it is there.
Step 2: Add your custom module
Scroll down to Add a module – “Gives this module its own folder, switches it on, and lets the file browser open on its records.” Open the Module dropdown and pick yours; custom modules are labelled custom in the list.
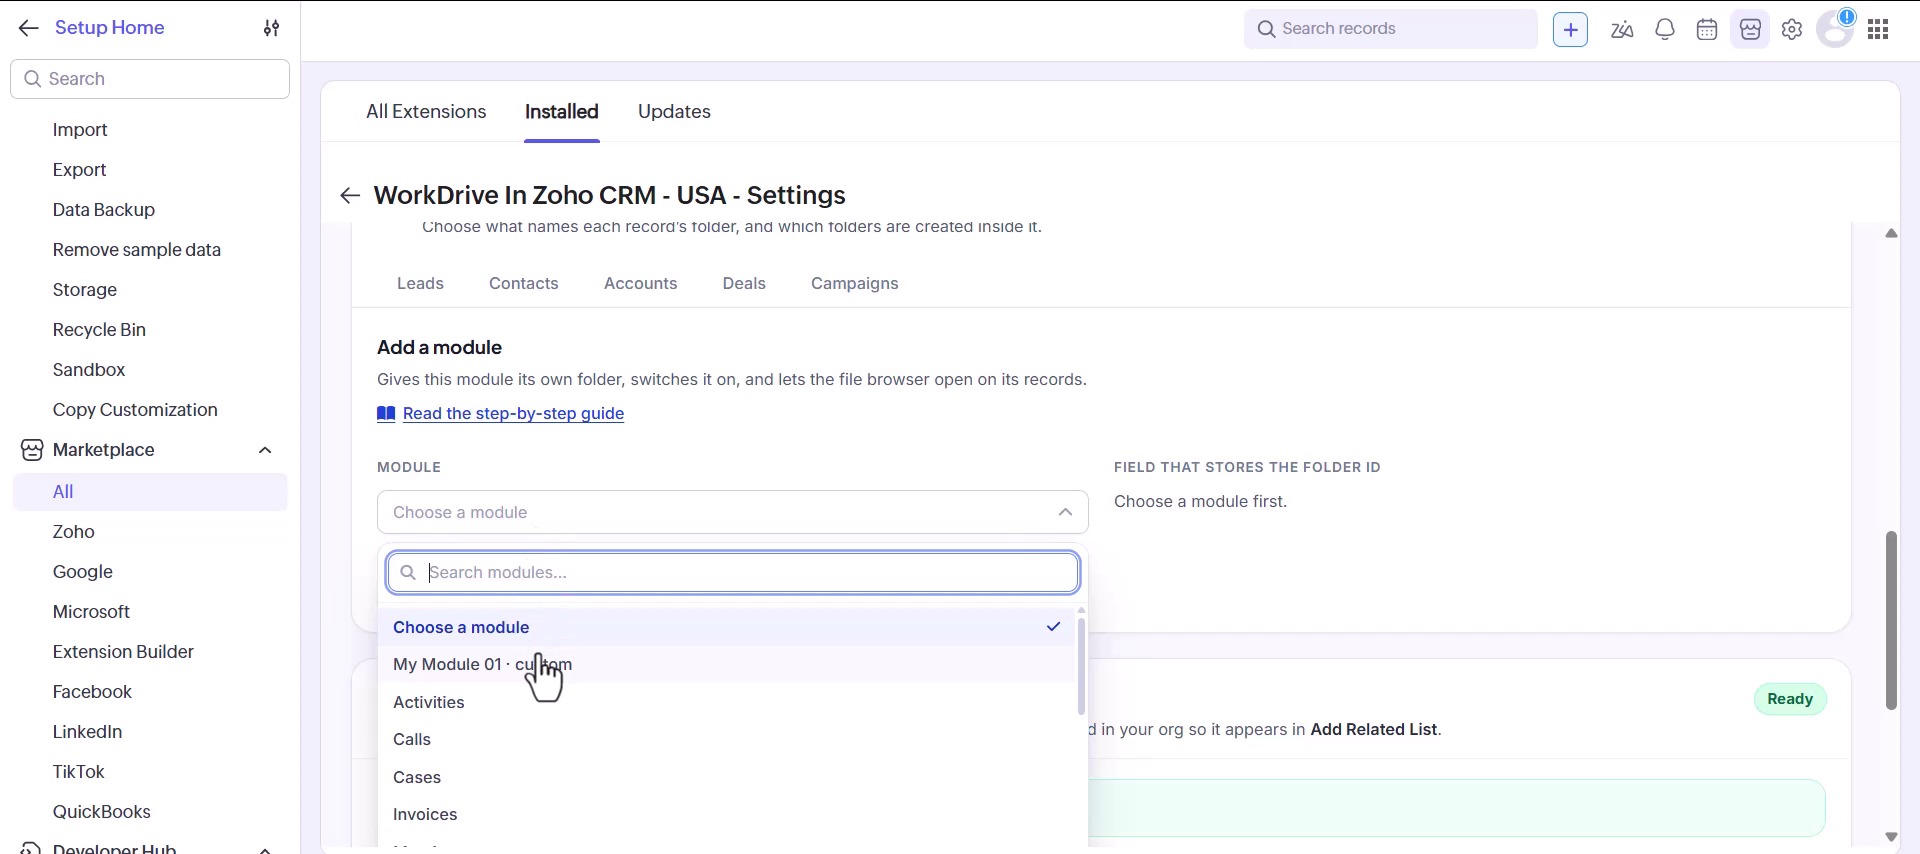
Then set Field that stores the folder id. Unless you already have a field kept aside for this, use the Or create a new “WorkDrive Folder Id” field link – it makes the field and selects it in one click.
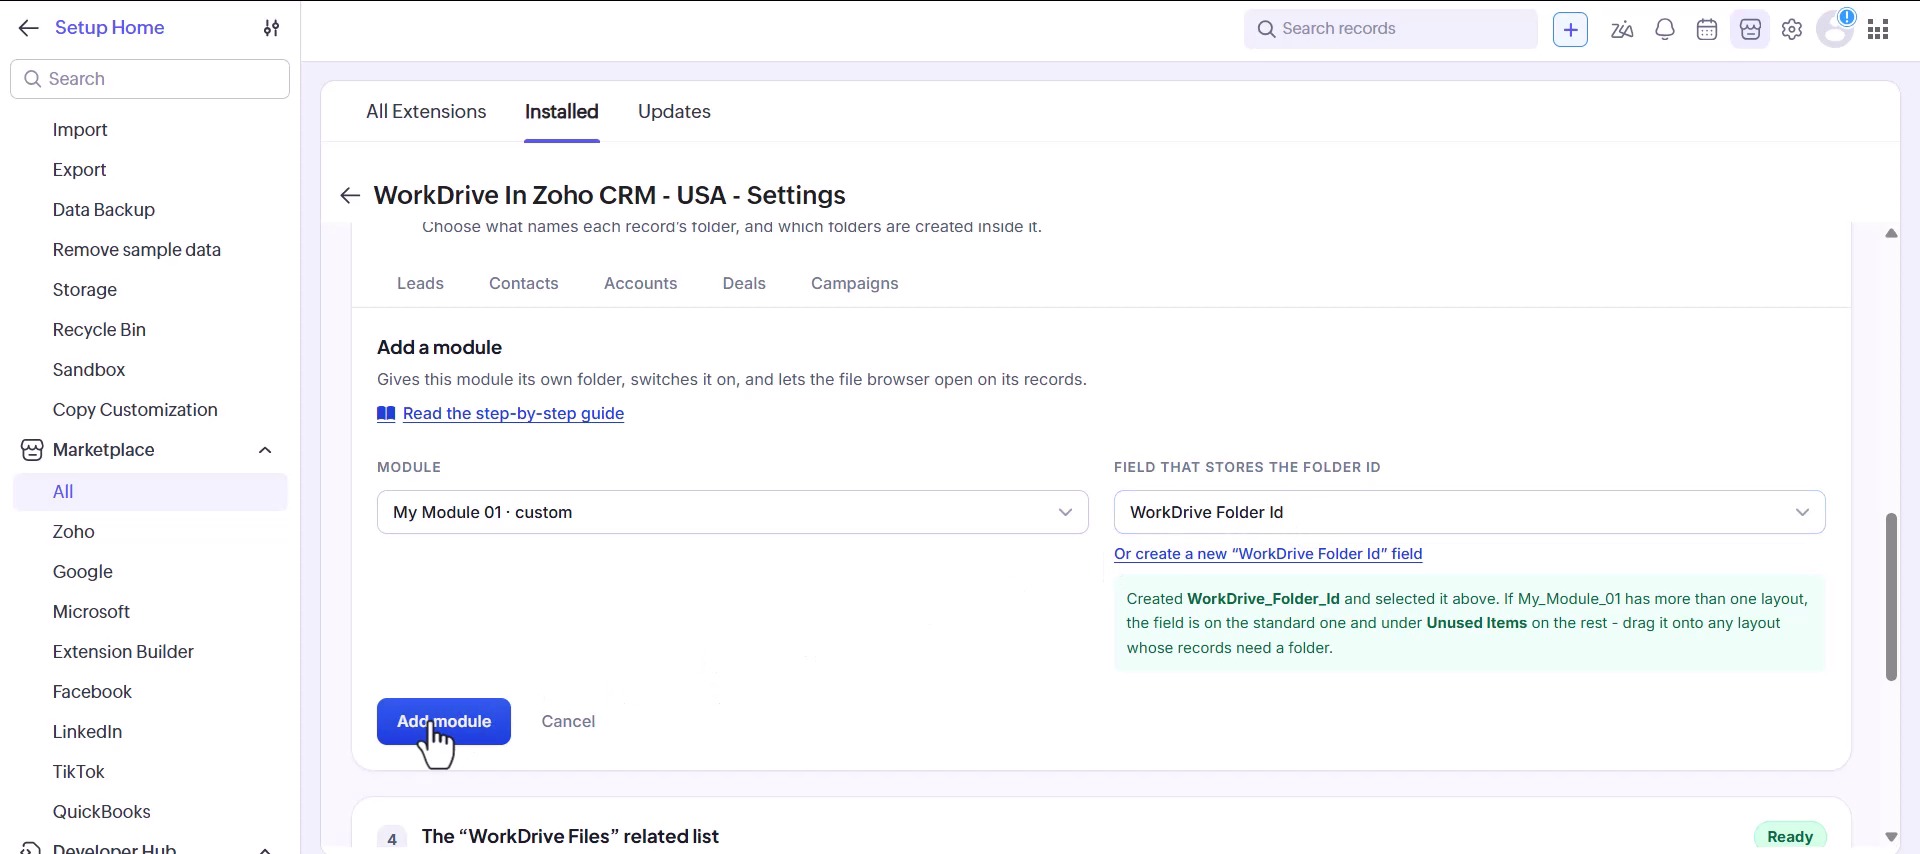
It is worth being deliberate here. The folder id is written to this field by automation, so pointing it at a field you already use for something else means that field gets overwritten. A record’s name field looks like a perfectly good single-line text field and is exactly the wrong choice – every record would end up named after a folder id.
One thing to watch if your module has more than one layout: the new field lands on the standard layout and sits under Unused Items on the others. Drag it onto any layout whose records need a folder, or those records will never get one.
Click Add module. Your module now appears alongside Leads, Contacts, Accounts and Deals, with its own switch – you can turn it off later without losing its settings.
Step 3: Decide what the folder is called
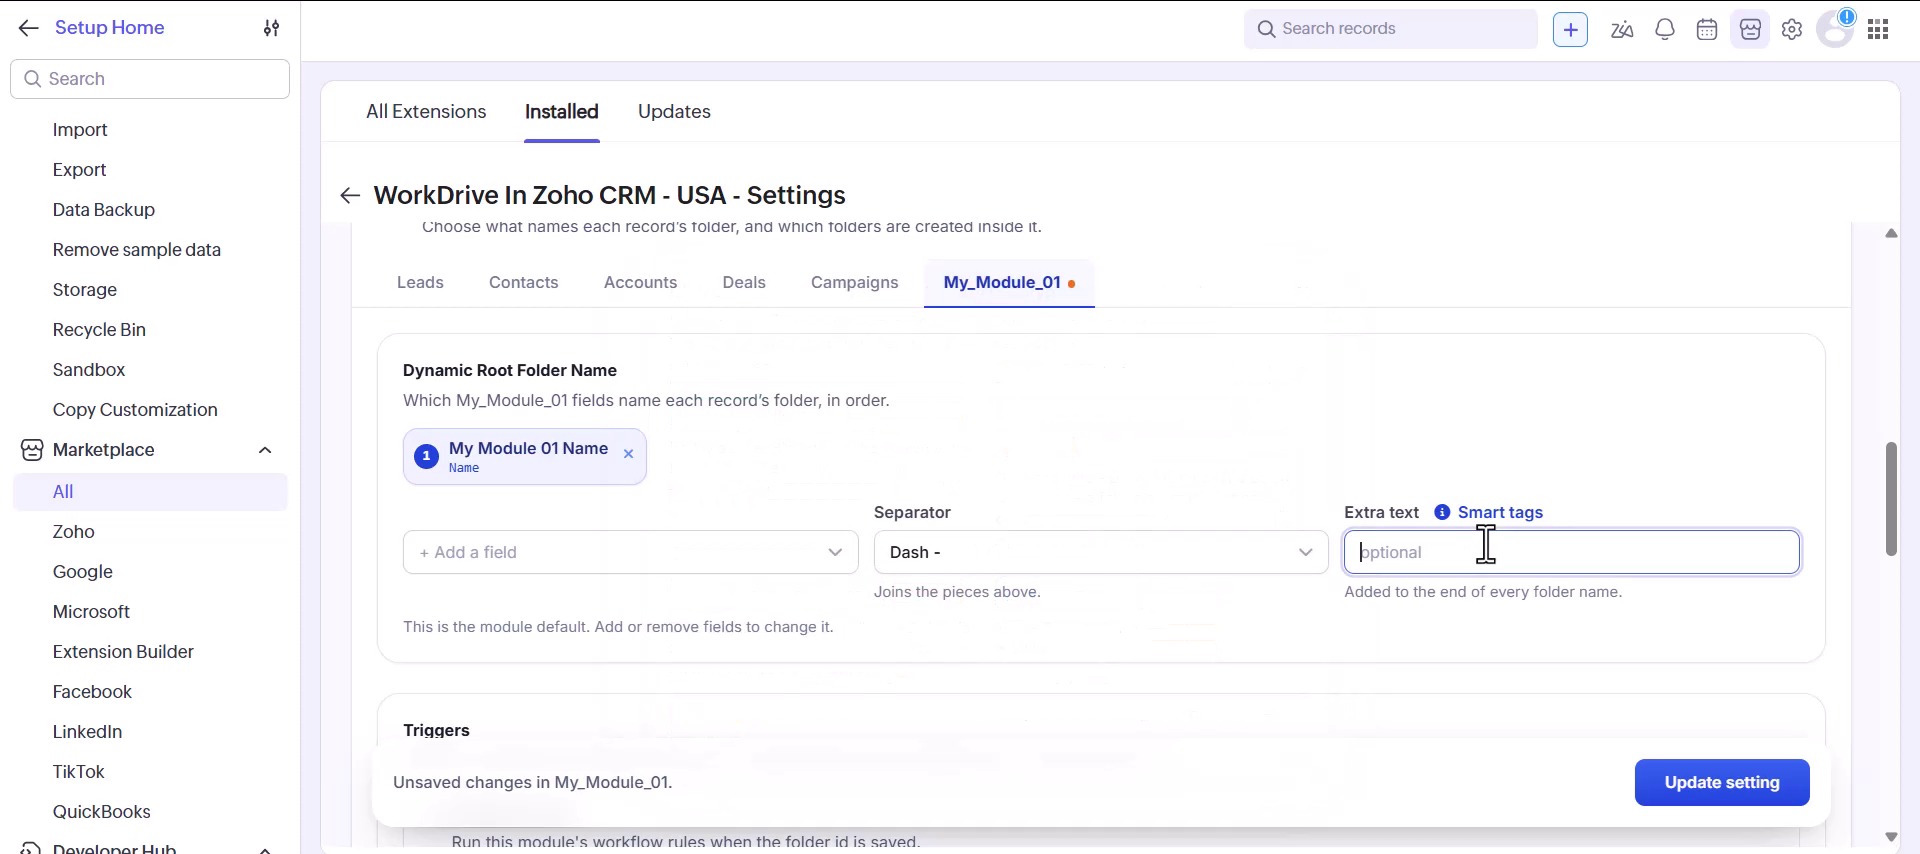
This is the part people wish they had spent longer on, because renaming a thousand folders later is not a five-minute job. The folder name is assembled from pieces:
- Named from: one or more fields from the record. The Name field is selected by default.
- Separator: what joins the pieces. A dash reads well and survives being copied into other systems.
- Extra text: fixed text, the same on every folder.
- Smart tags: values resolved when the folder is made: the record id, its owner, who created it, the current date.
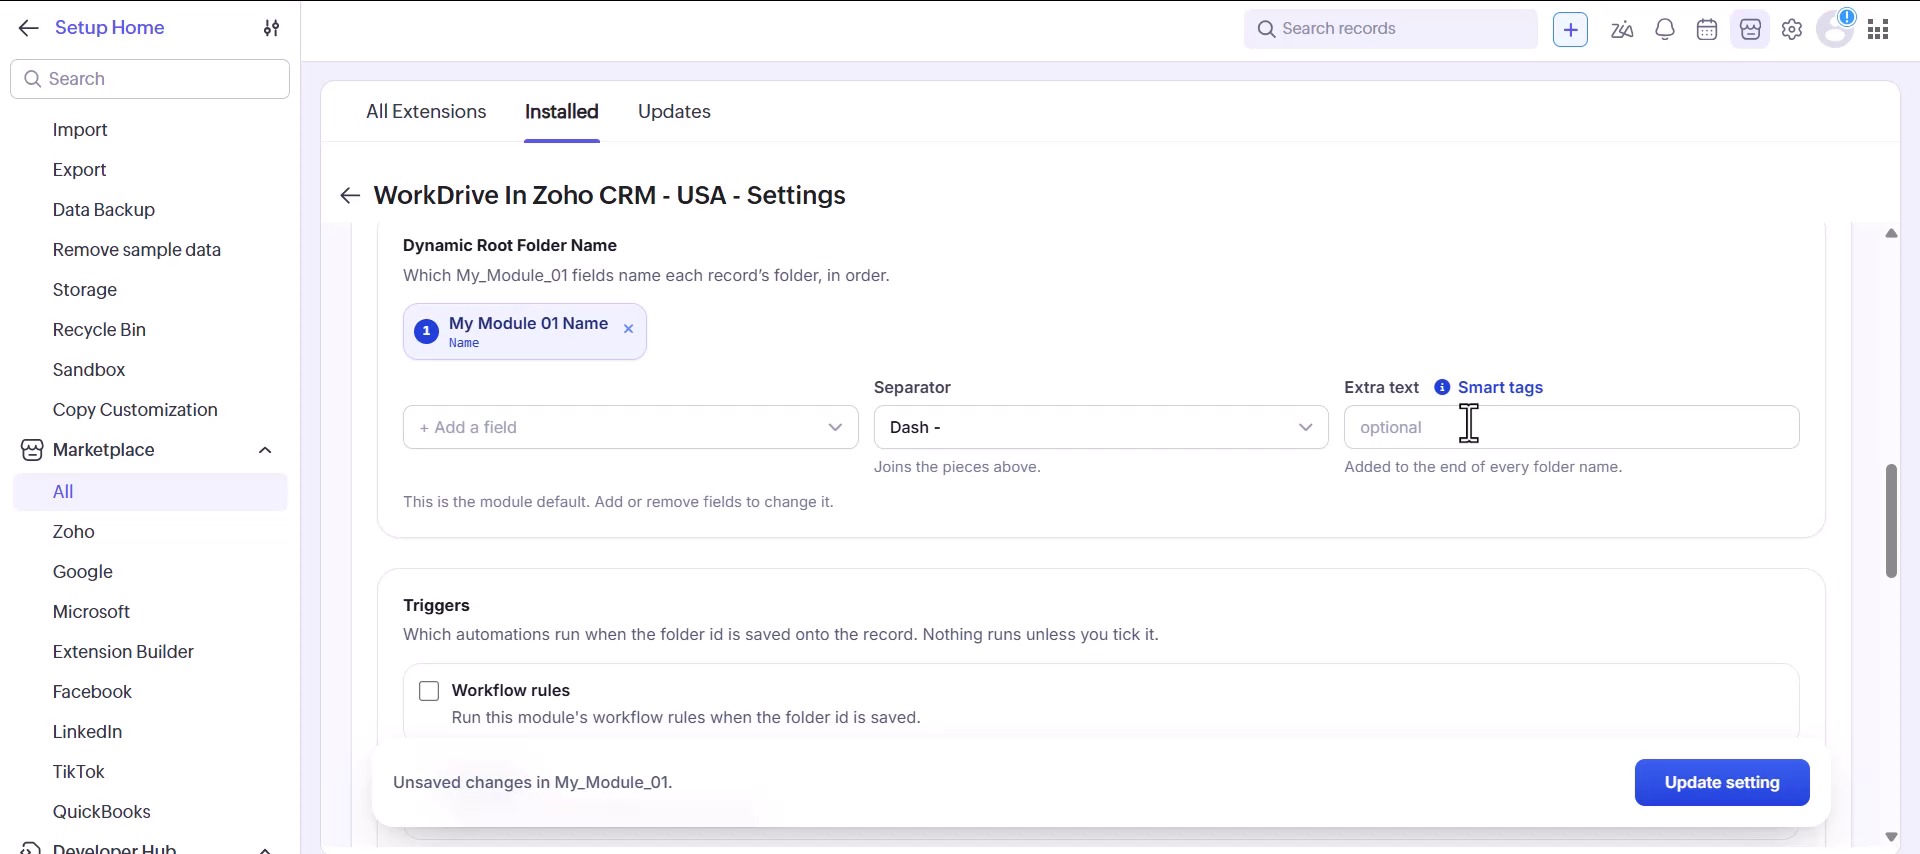
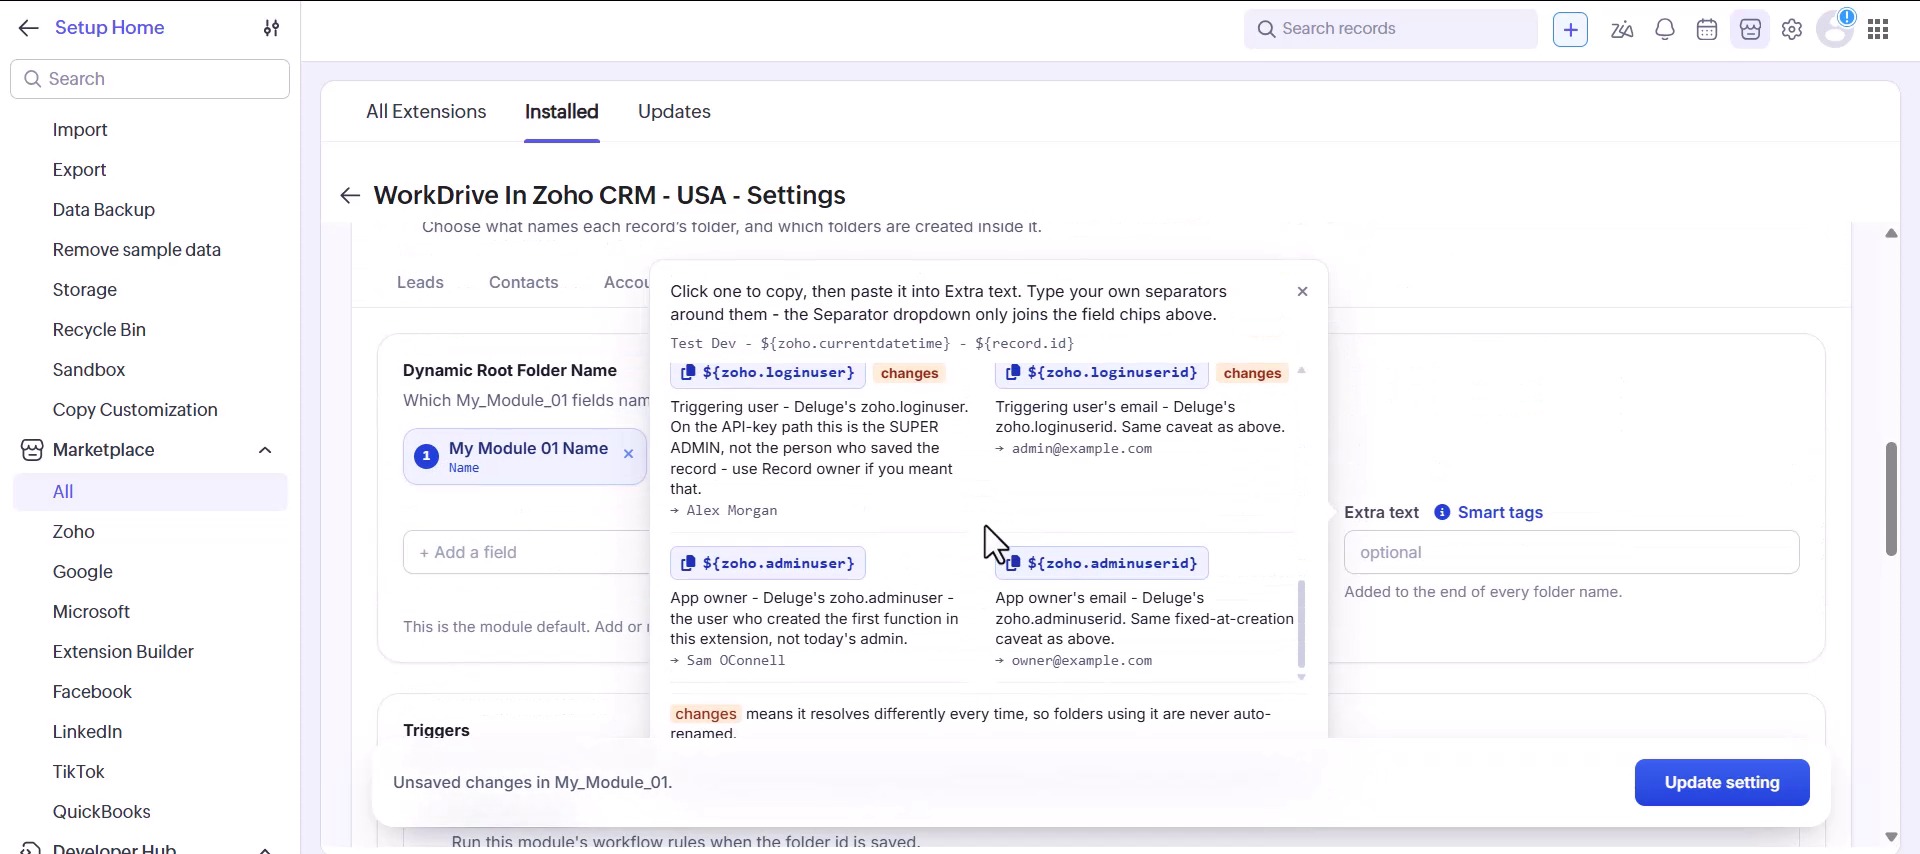
Two rules of thumb. Put something unique in the name – two records called “Acme Ltd” produce two folders called “Acme Ltd”, and only the record id tells them apart afterwards. And put dates in YYYY-MM order, because that is the only order in which folders sort correctly.
Triggers
Below the name is a Triggers panel: “Which automations run when the folder id is saved onto the record. Nothing runs unless you tick it.”
- Workflow rules: run this module’s workflow rules when the folder id is saved.
- Blueprint: let a Blueprint transition see the change.
- Approval process: let approval rules pick the record up.
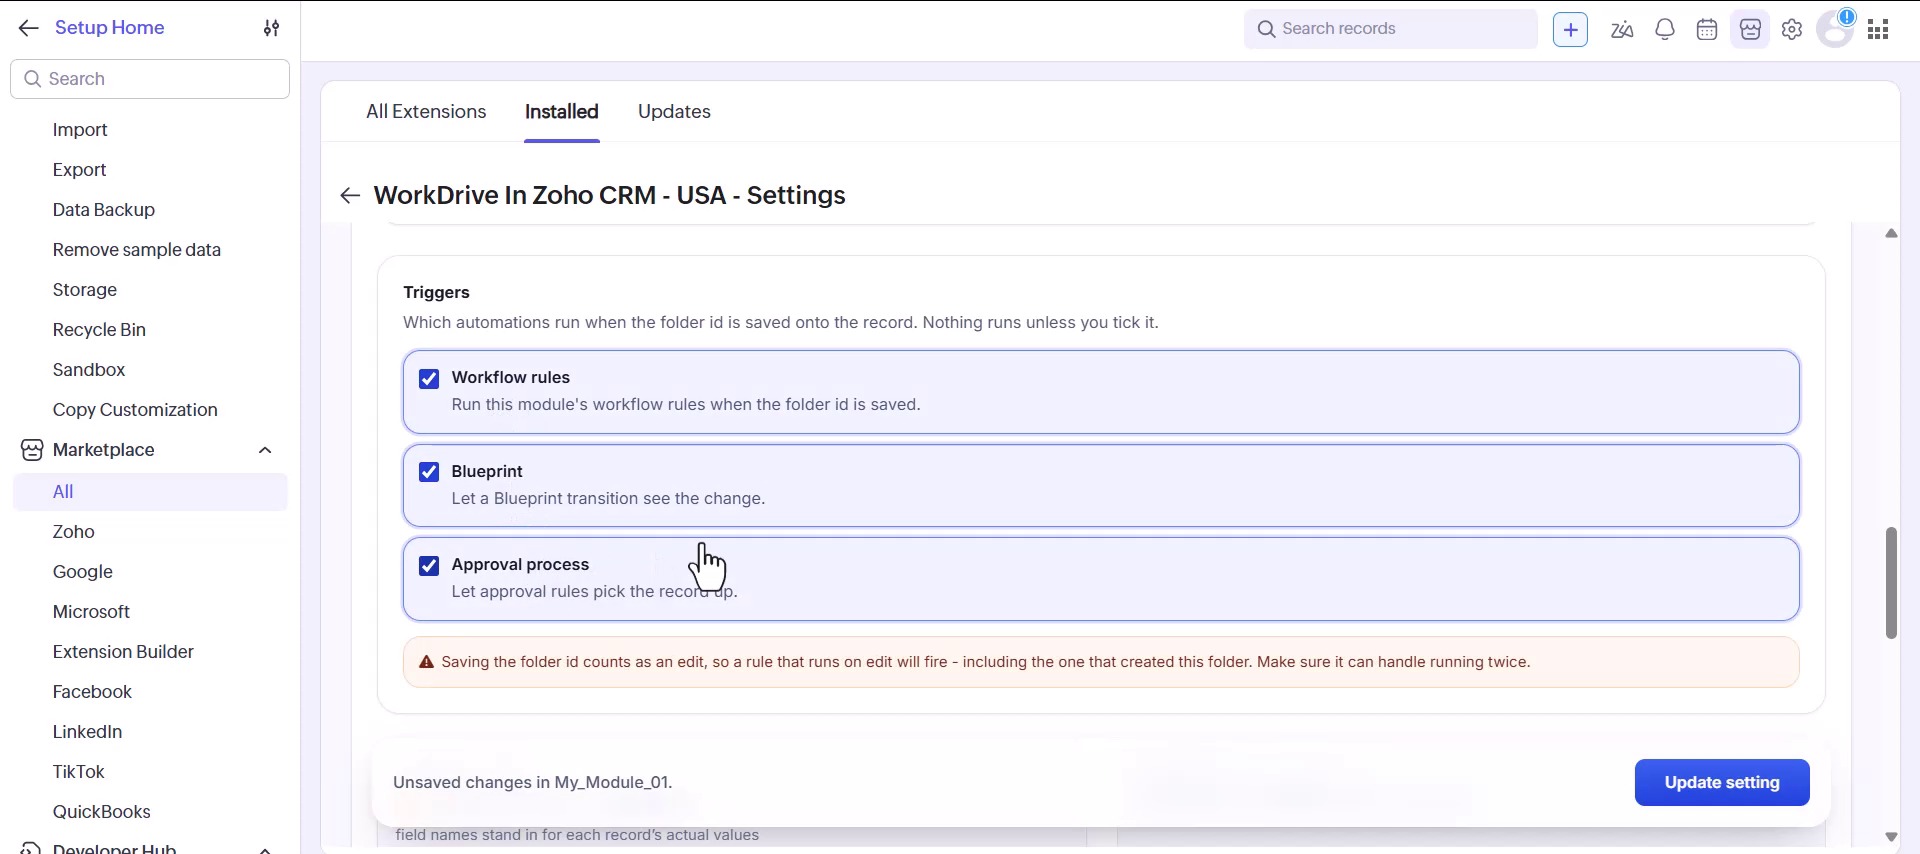
Leave them off unless something downstream genuinely needs to react. The settings page warns why: saving the folder id counts as an edit, so a rule that runs on edit will fire – including the rule that created this folder in the first place. If you switch these on, make sure your rules can handle running twice.
Step 4: Build the folder structure
Under Folder structure you can have subfolders created inside every new record folder – Contracts, Invoices, Site photos, whatever the work actually is. Click Add folder and name it the same way you named the parent: from a field, from fixed text, or from both.
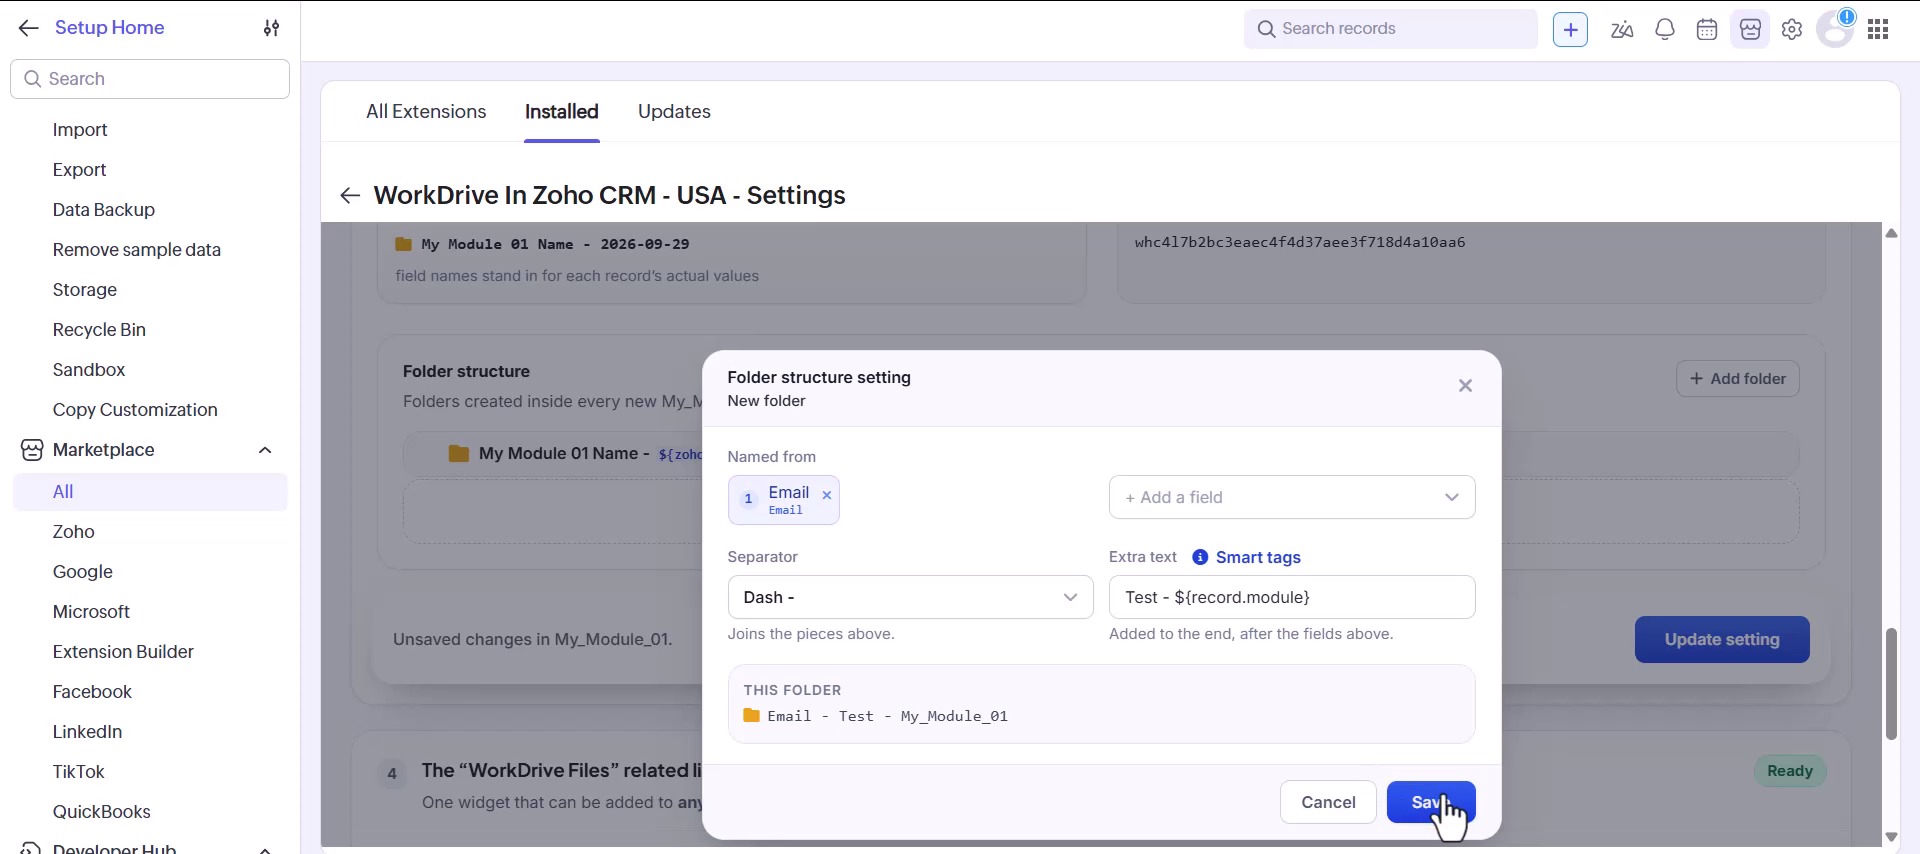
Subfolders are created once, when the record’s folder is created. Adding one later does not reach back and add it to folders that already exist, so it is worth getting this right before you start creating records in earnest.
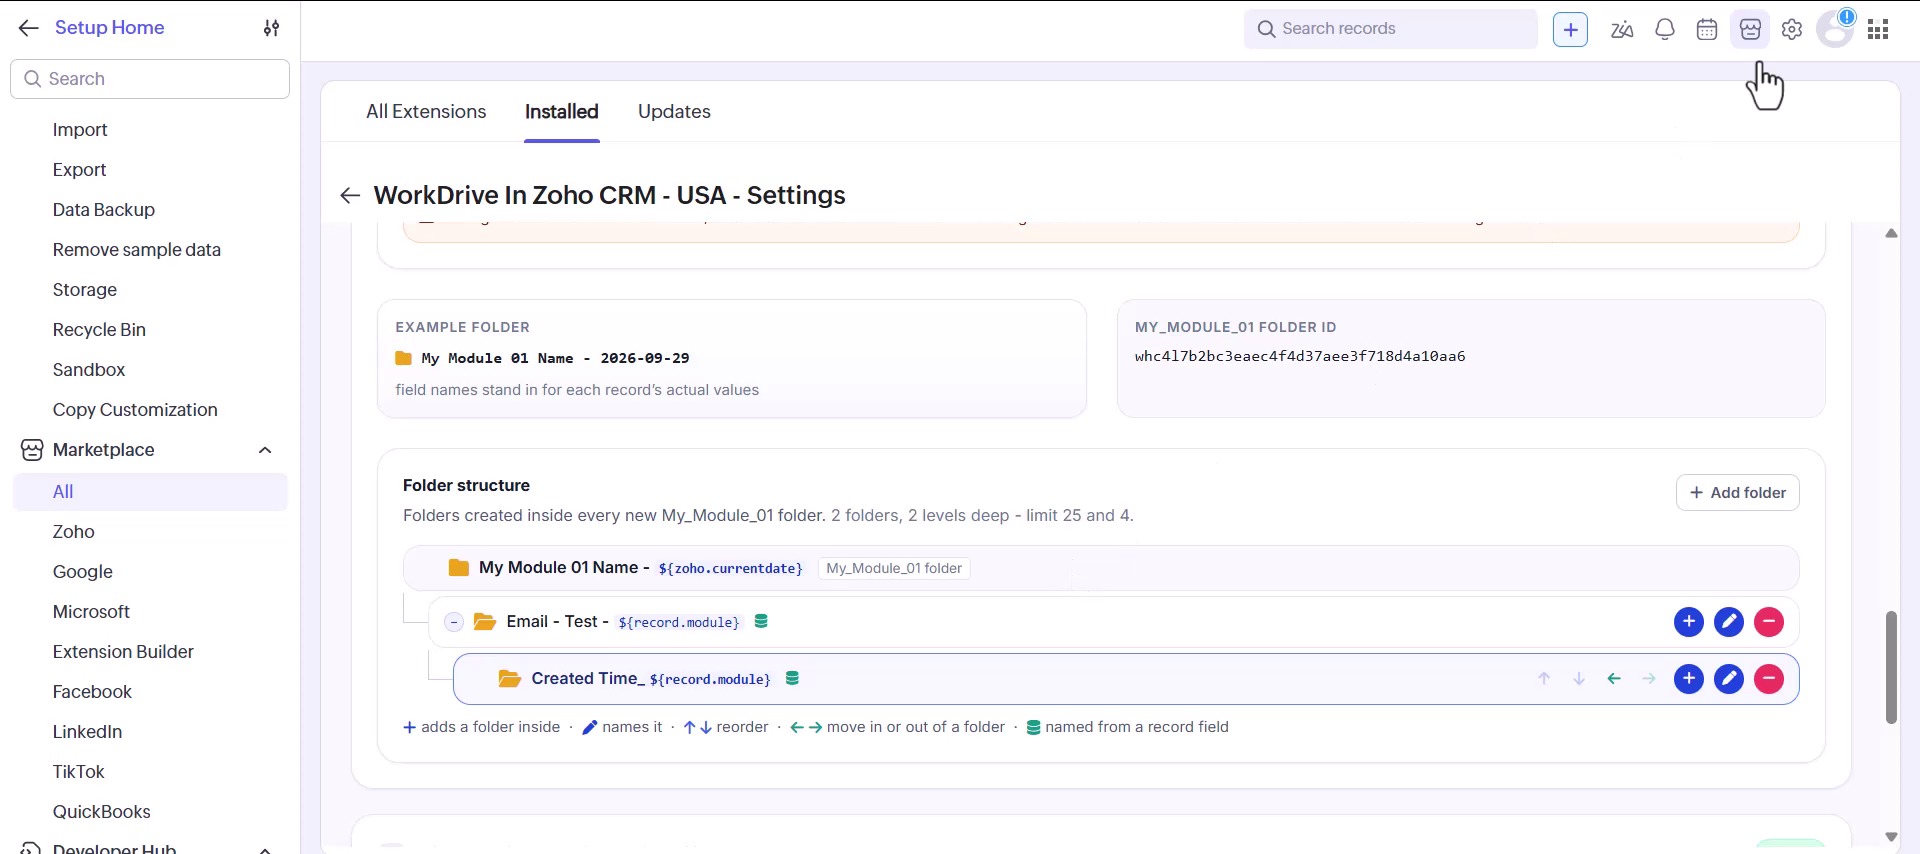
Click Update setting to save. The page tells you there are unsaved changes until you do.
Step 5: Create the workflow rule that makes the folder
Settings tell the extension how to name a folder. Something still has to ask for one to be made, and on a custom module that something is a workflow rule you create yourself.
5.1 Open Workflow Rules
Go to Setup › Automation › Workflow Rules and click Create Rule.
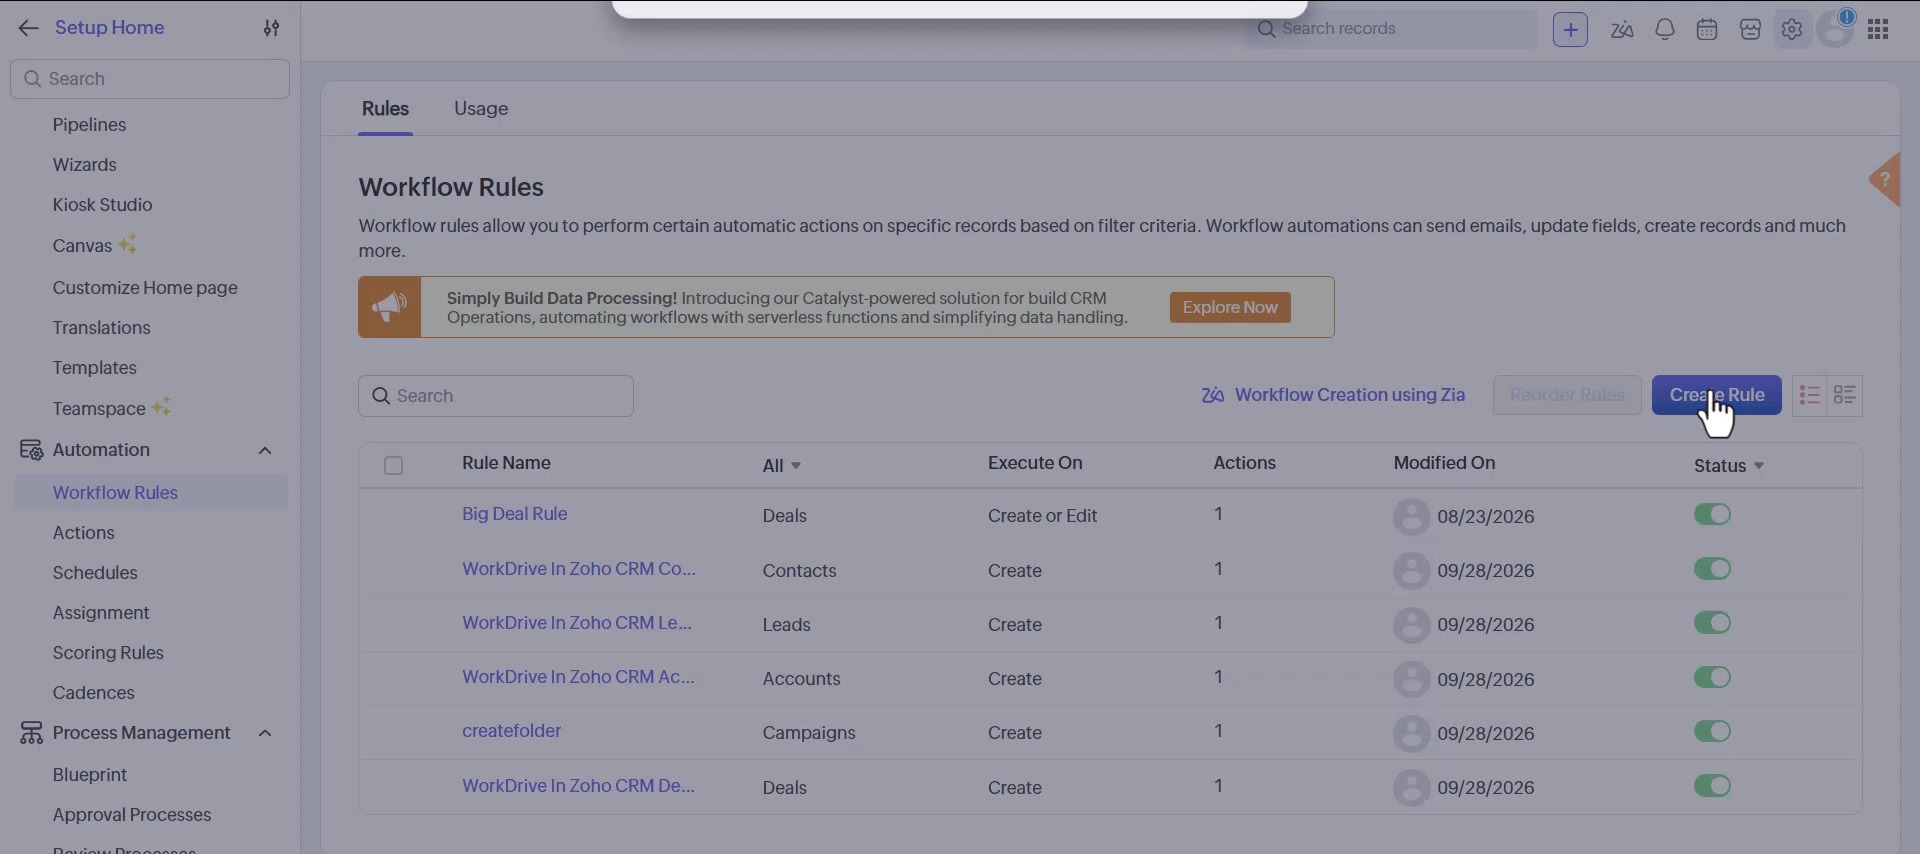
5.2 Pick the module and name the rule
Choose the same module you added in Step 2, and give the rule a name you will recognise in a list of forty – Create WorkDrive folder is enough. Click Next.
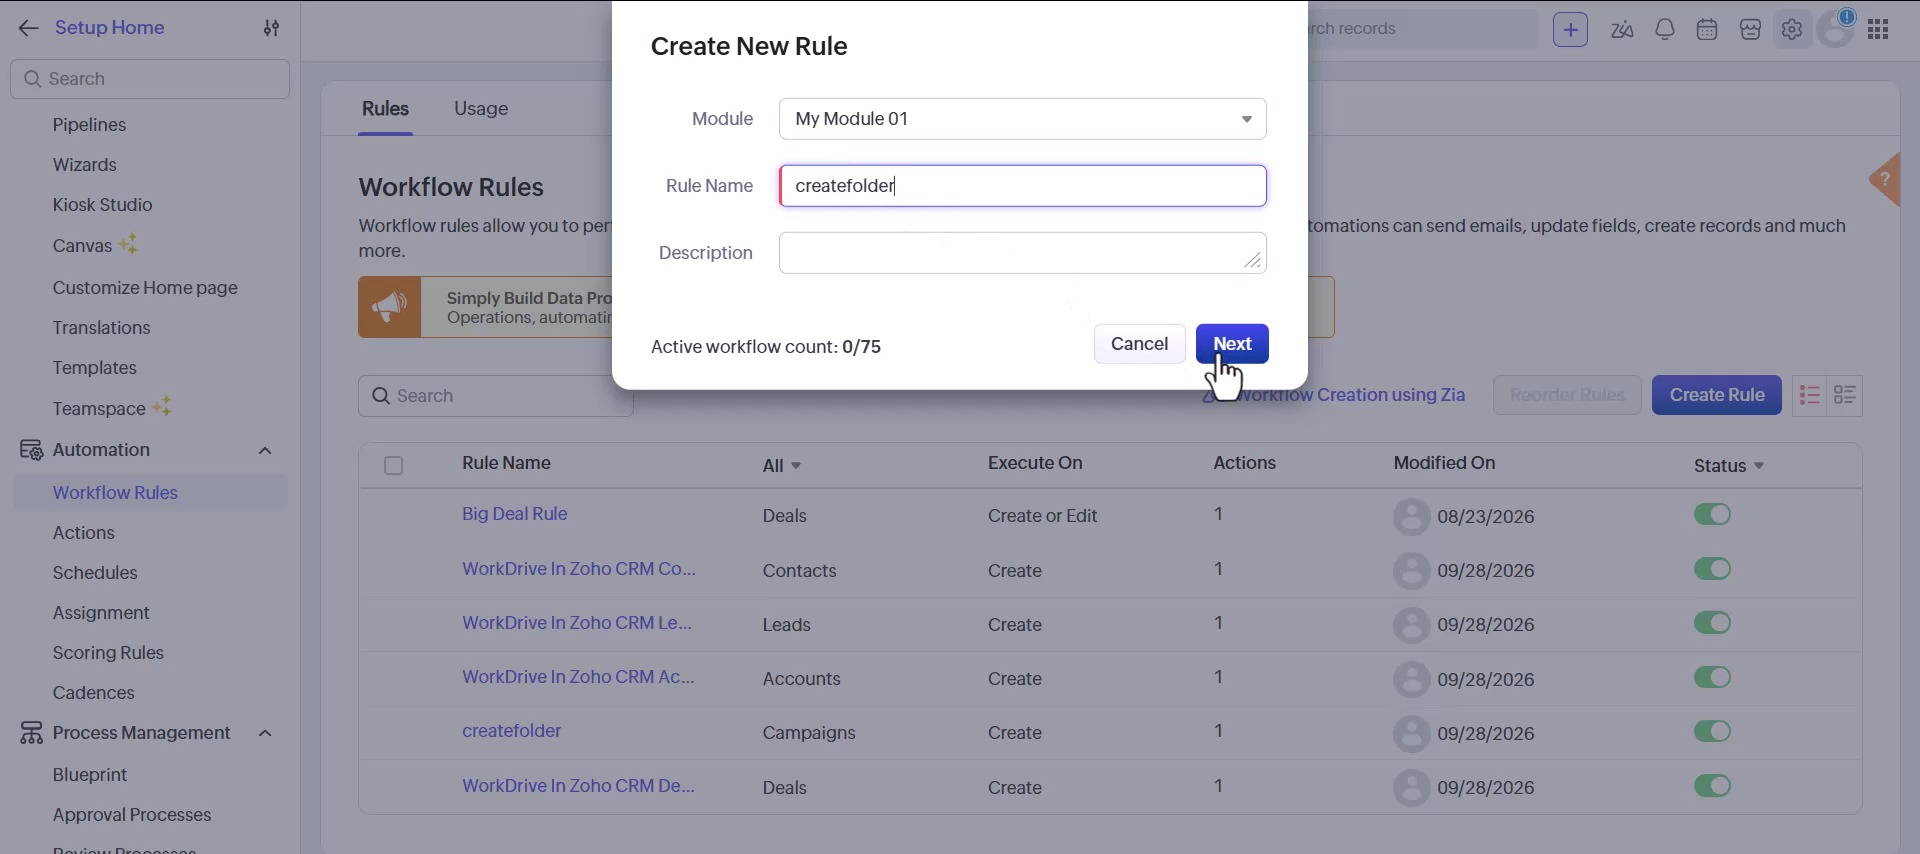
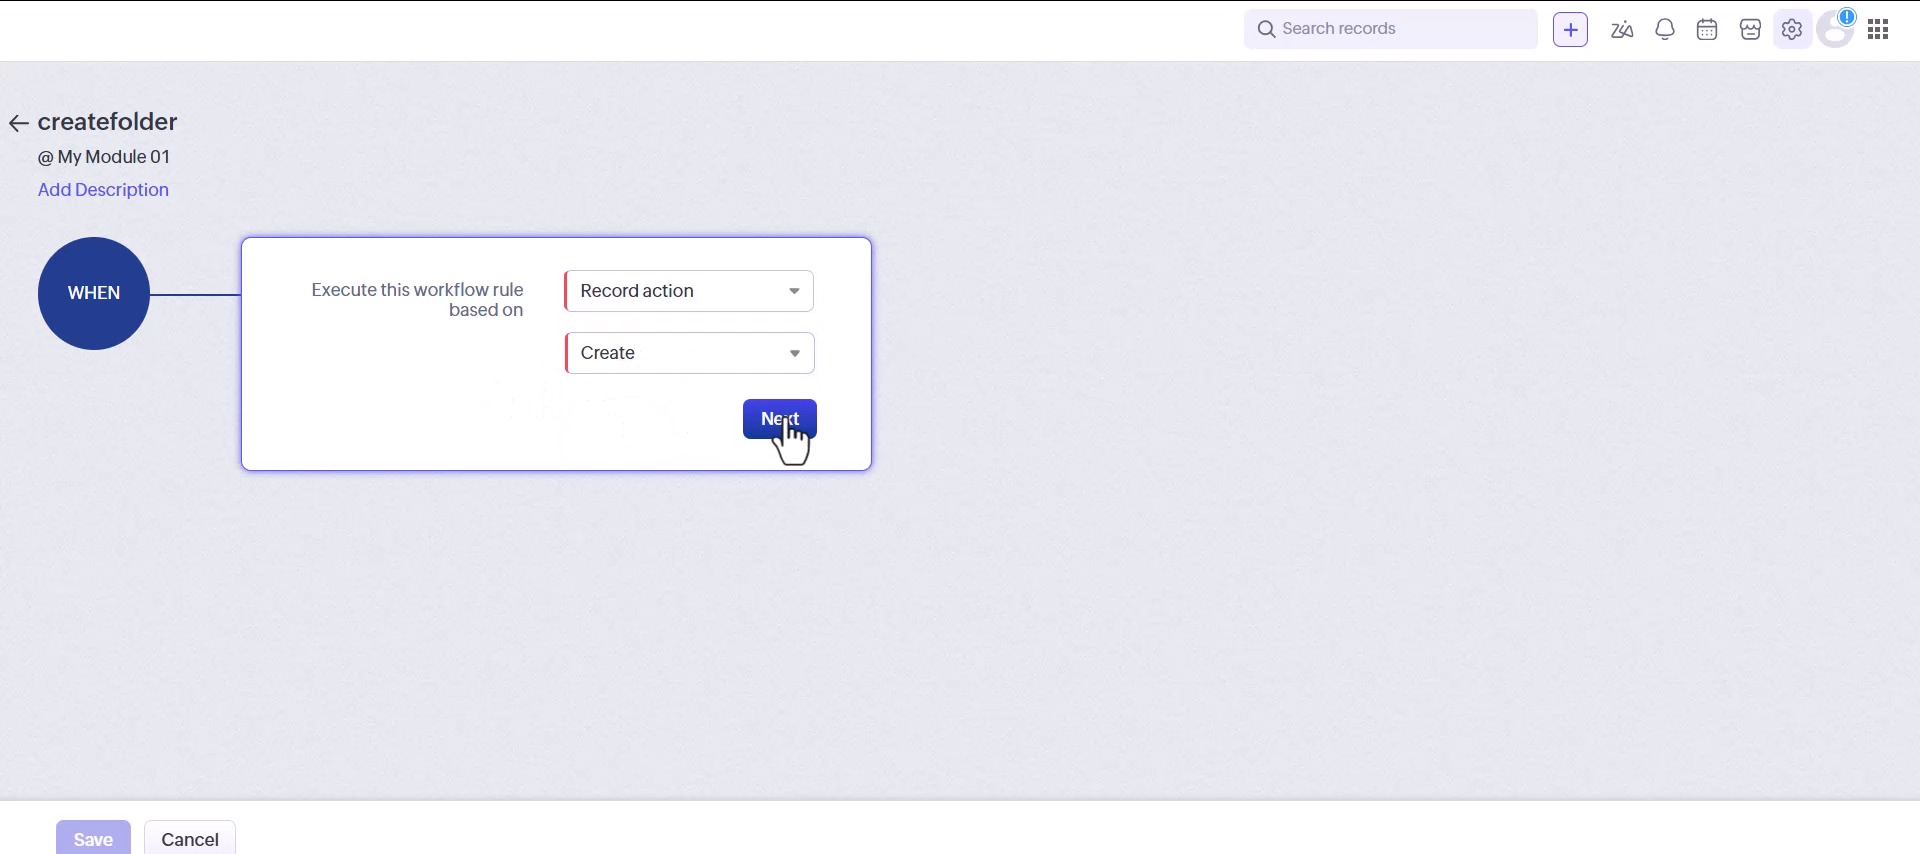
5.3 Trigger it on record creation
Under When do you want to execute this rule? choose Record Action, then Create.
5.4 Apply it to every record
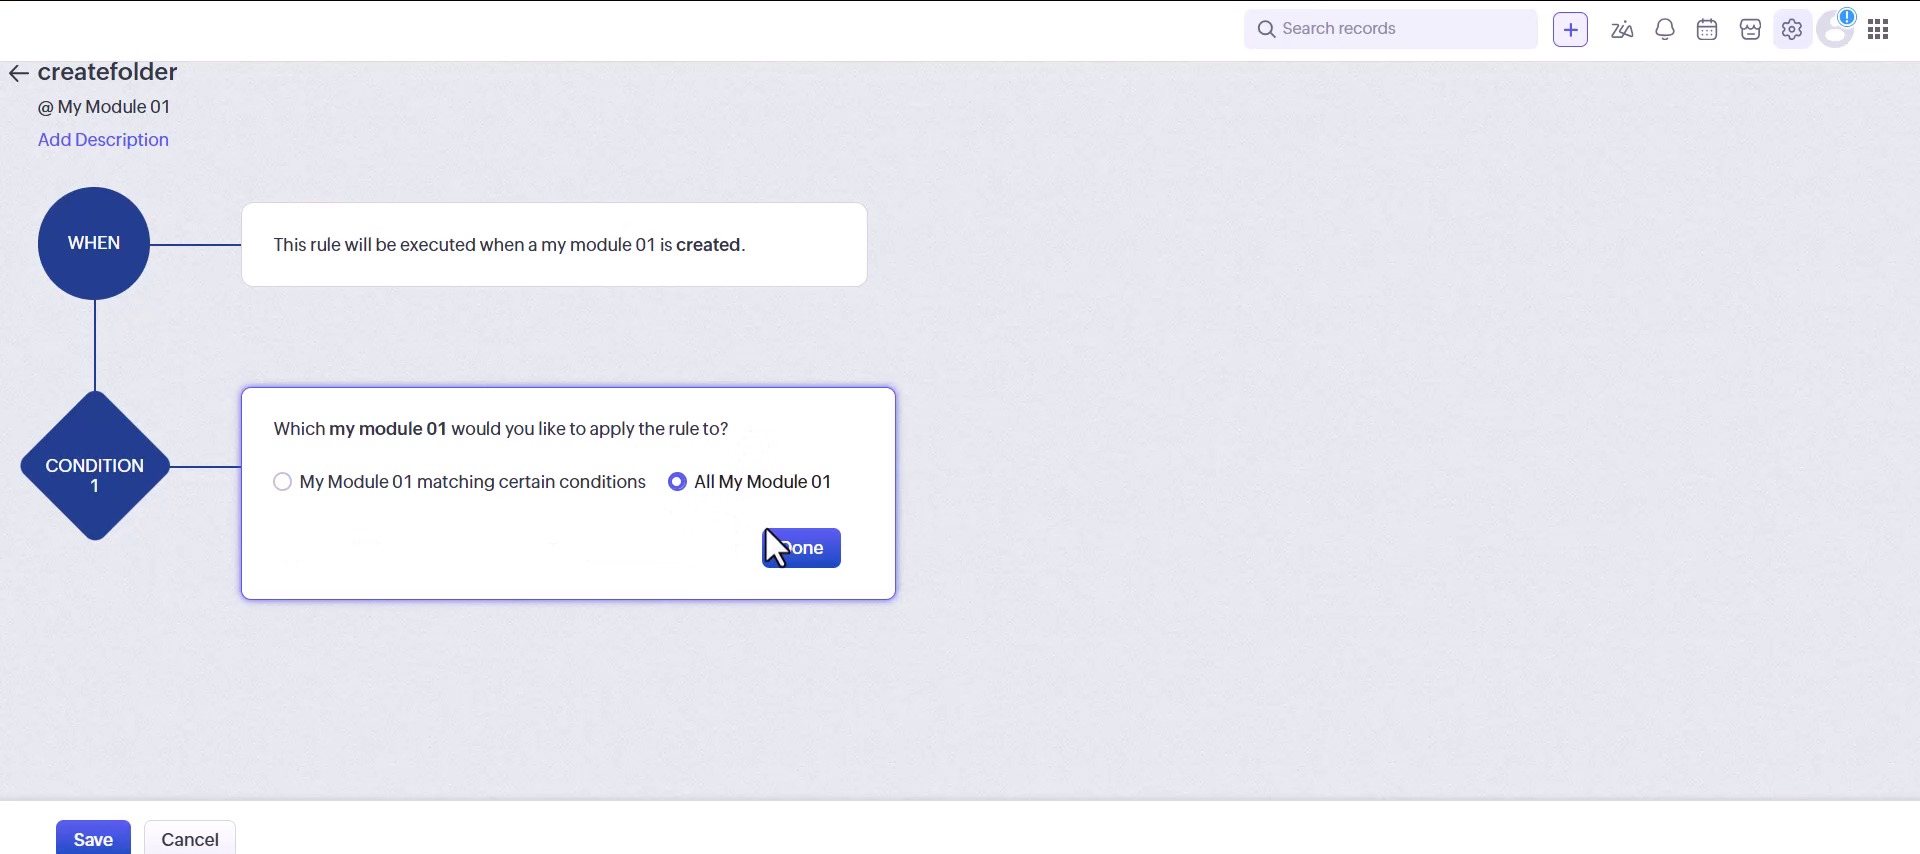
Leave the condition set to all records in the module and click Done. A condition here means records that fail it never get a folder, and nothing on the record will say why.
5.5 Add the folder-create function
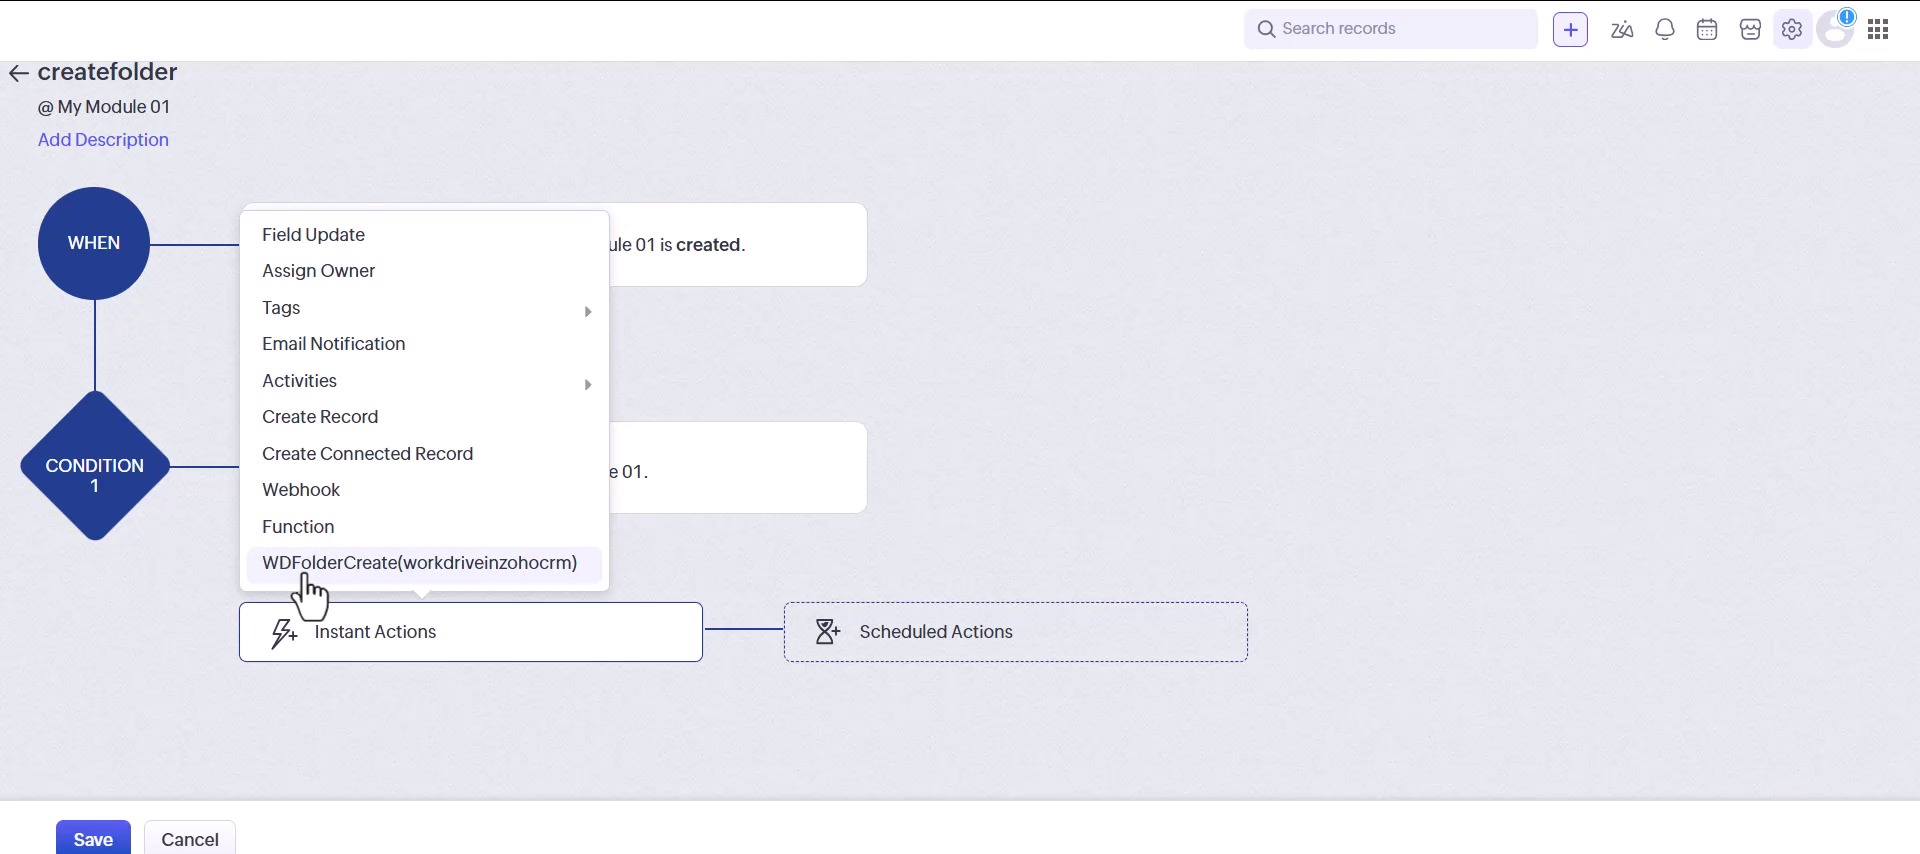
Under Instant Actions choose Function, and pick WDFolderCreate(workdriveinzohocrm) – the one the extension installed, not a function of your own.
5.6 Name the action and save
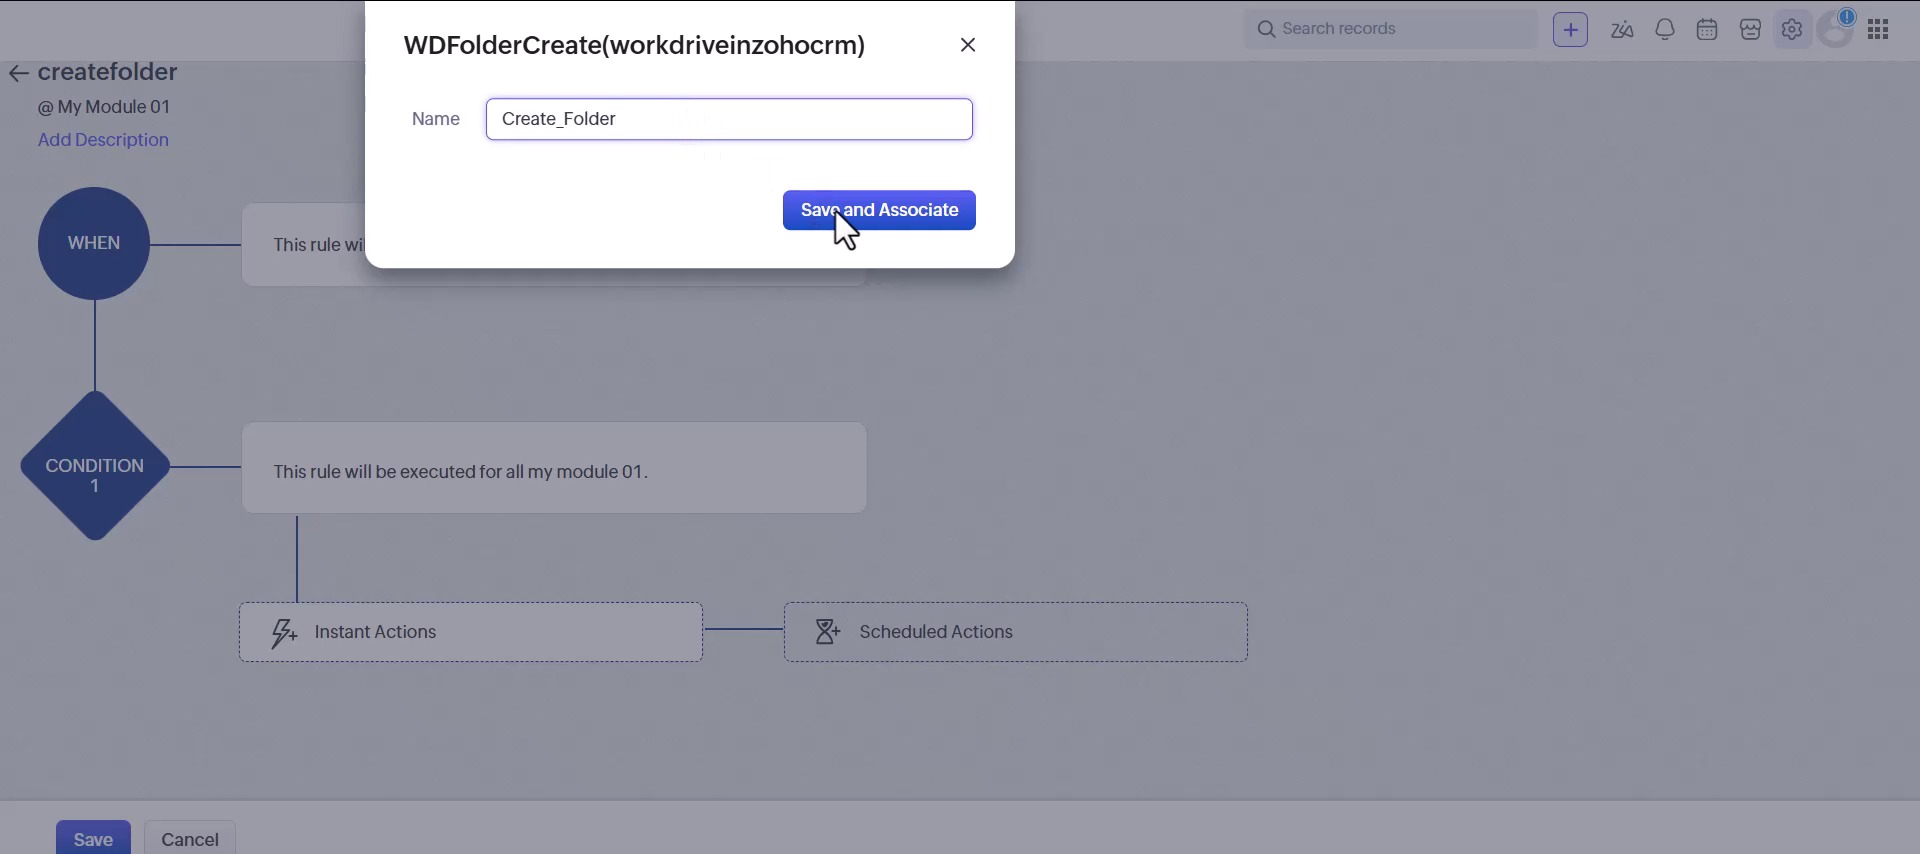
Give the instant action a name, click Save and Associate, then save the rule itself.
Step 6: Add the WorkDrive Files related list
Open any record in the module – reload the page first if you have had it open since Step 1 – and in the Related List panel on the left, click Add Related List.
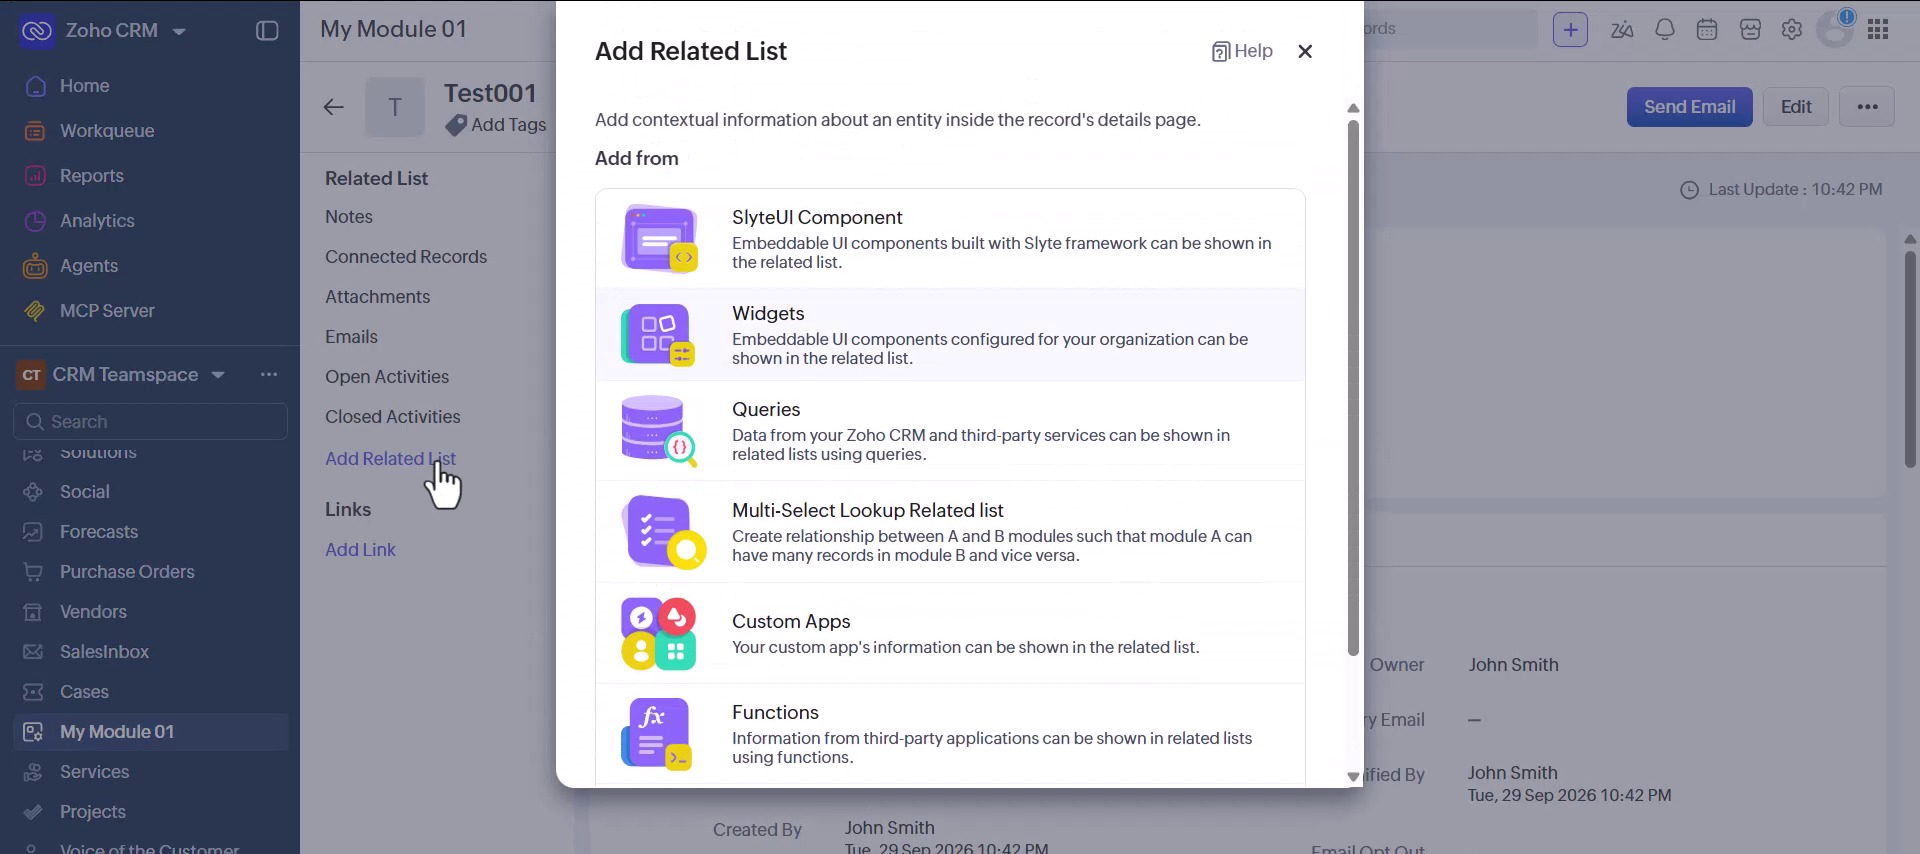
Choose Widgets.
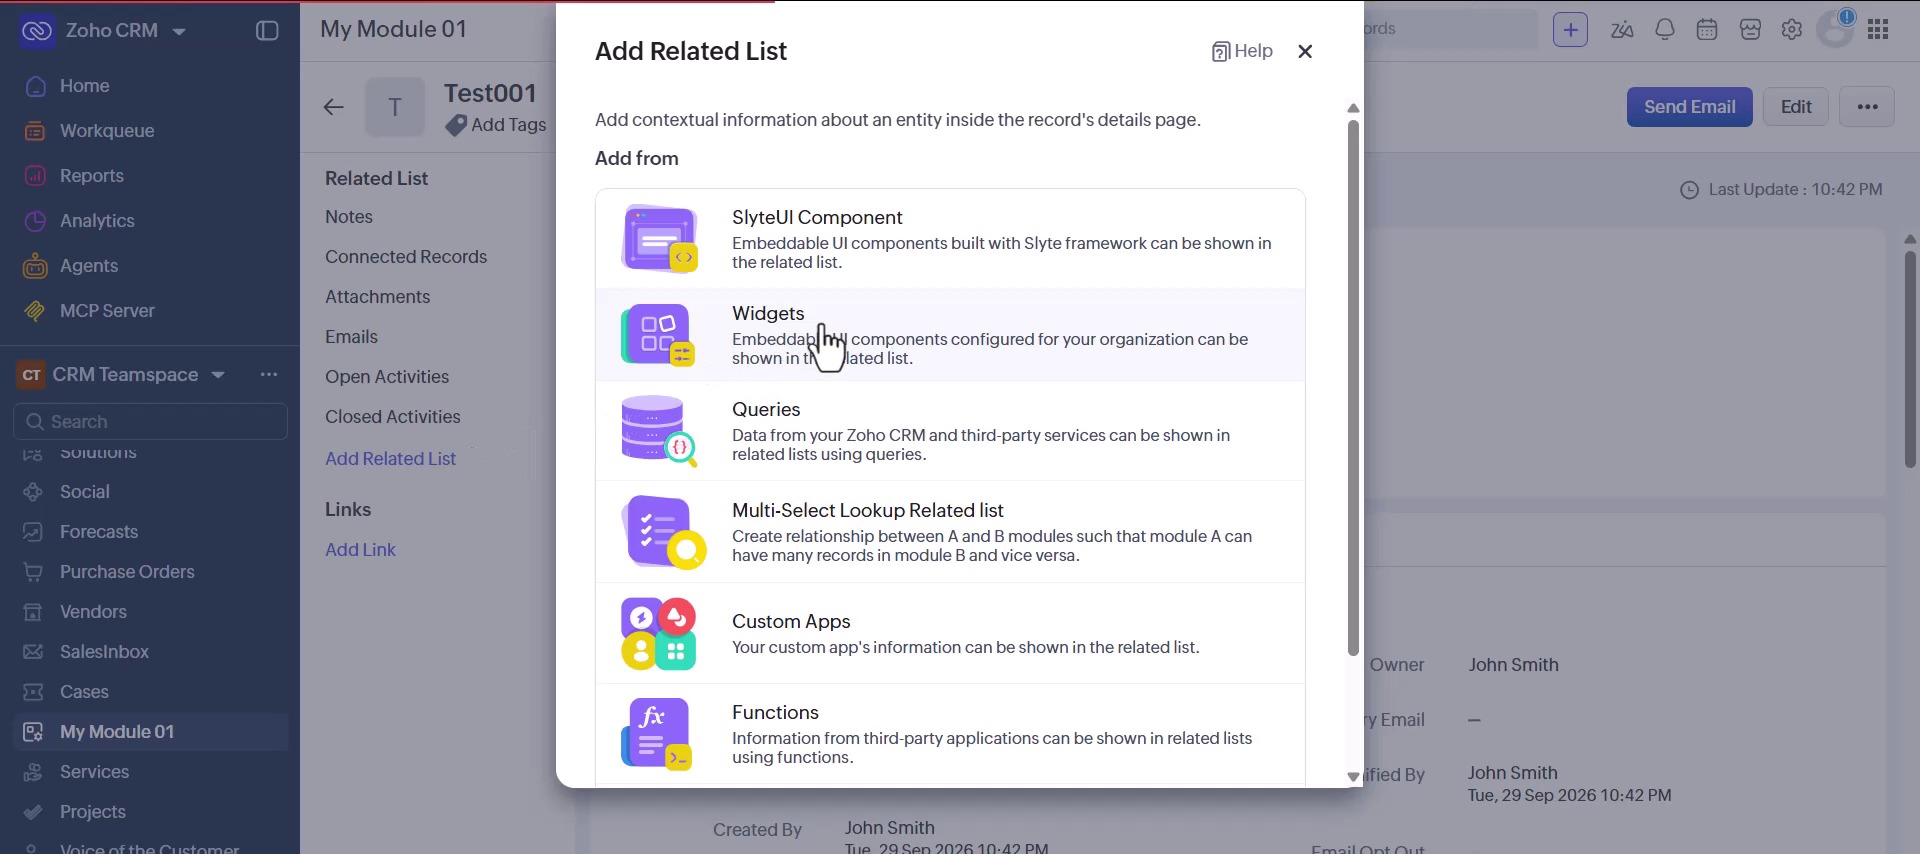
In Choose Widget, find WorkDrive Files – “Browse, upload, preview and share this record’s files” – and click Install. Rename it if you want to, then save.
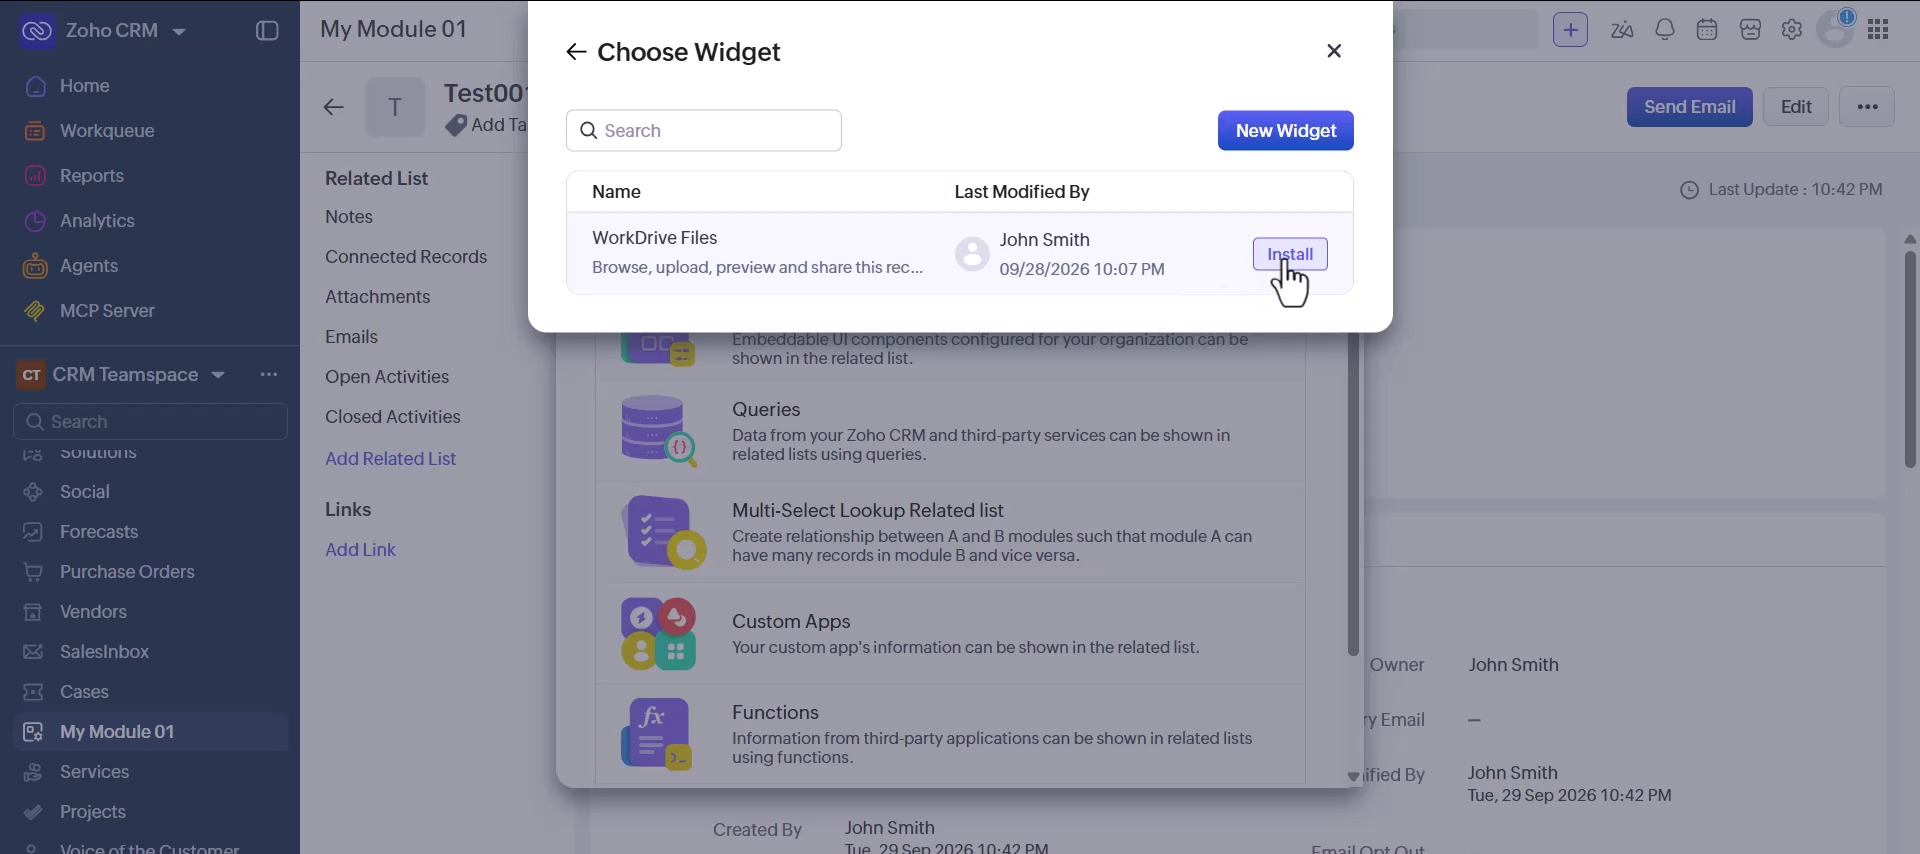
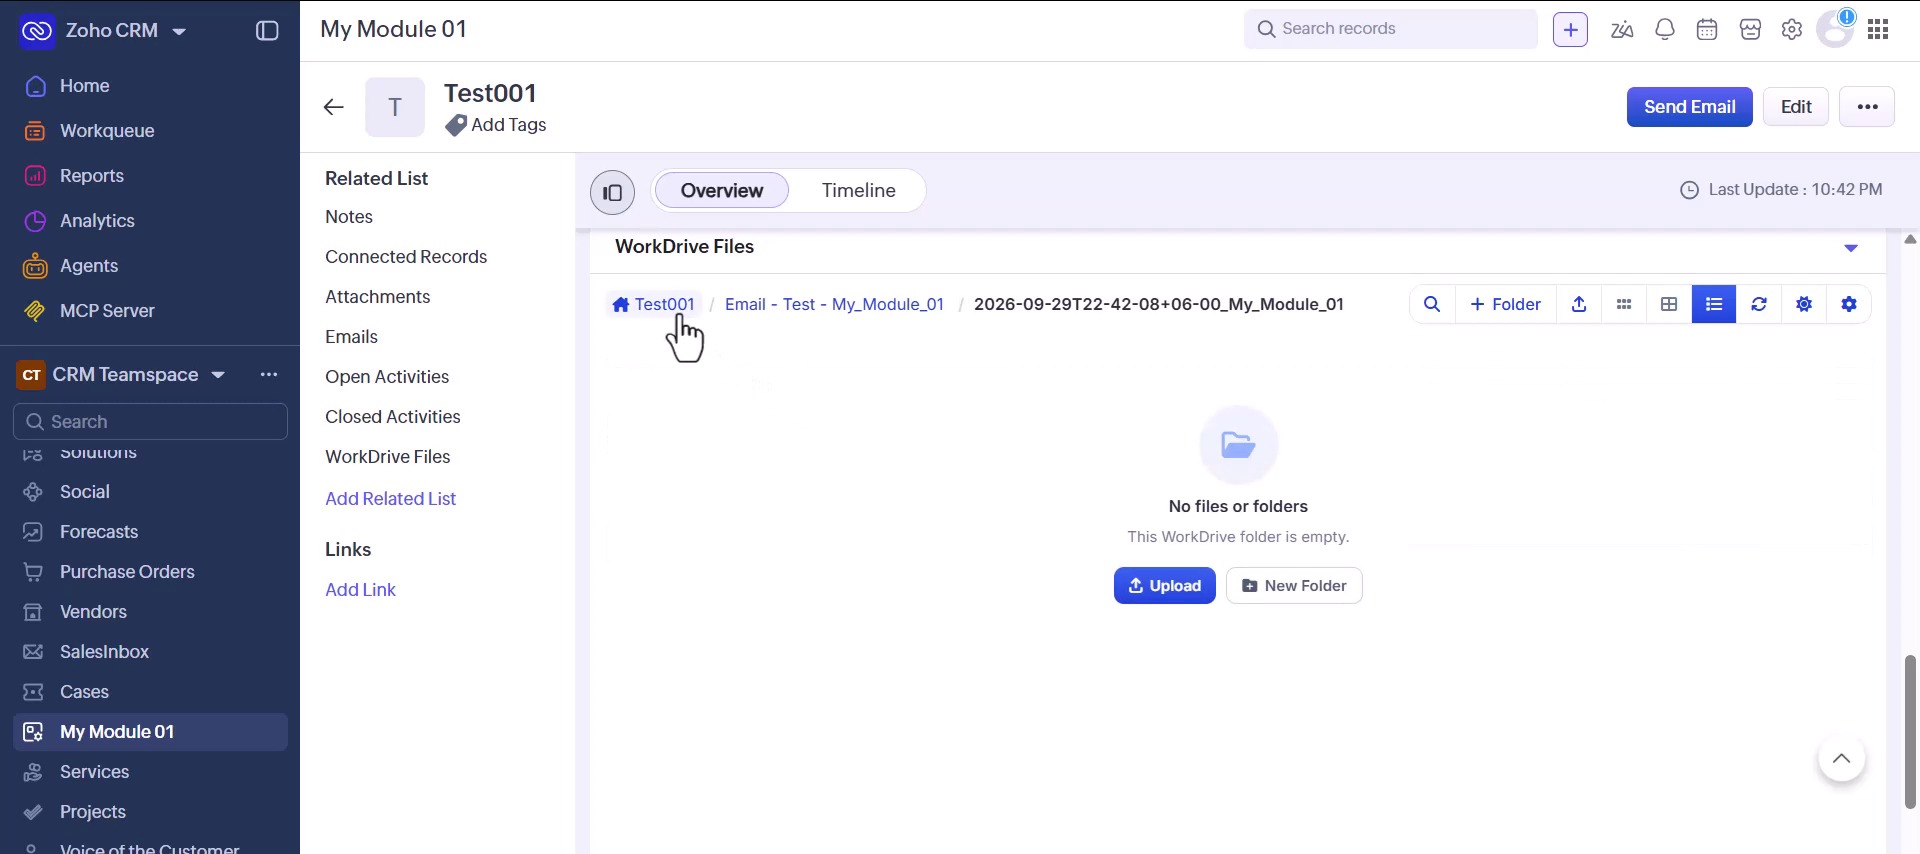
This is once per module, not once per record, and it stays on the layout. Repeat it on each module you want the file manager on.
Step 7: Test it end to end
- Create a new record in the module and save it.
- Open it and check the WorkDrive Folder Id field. It should have filled itself in – that is the workflow rule reporting success.
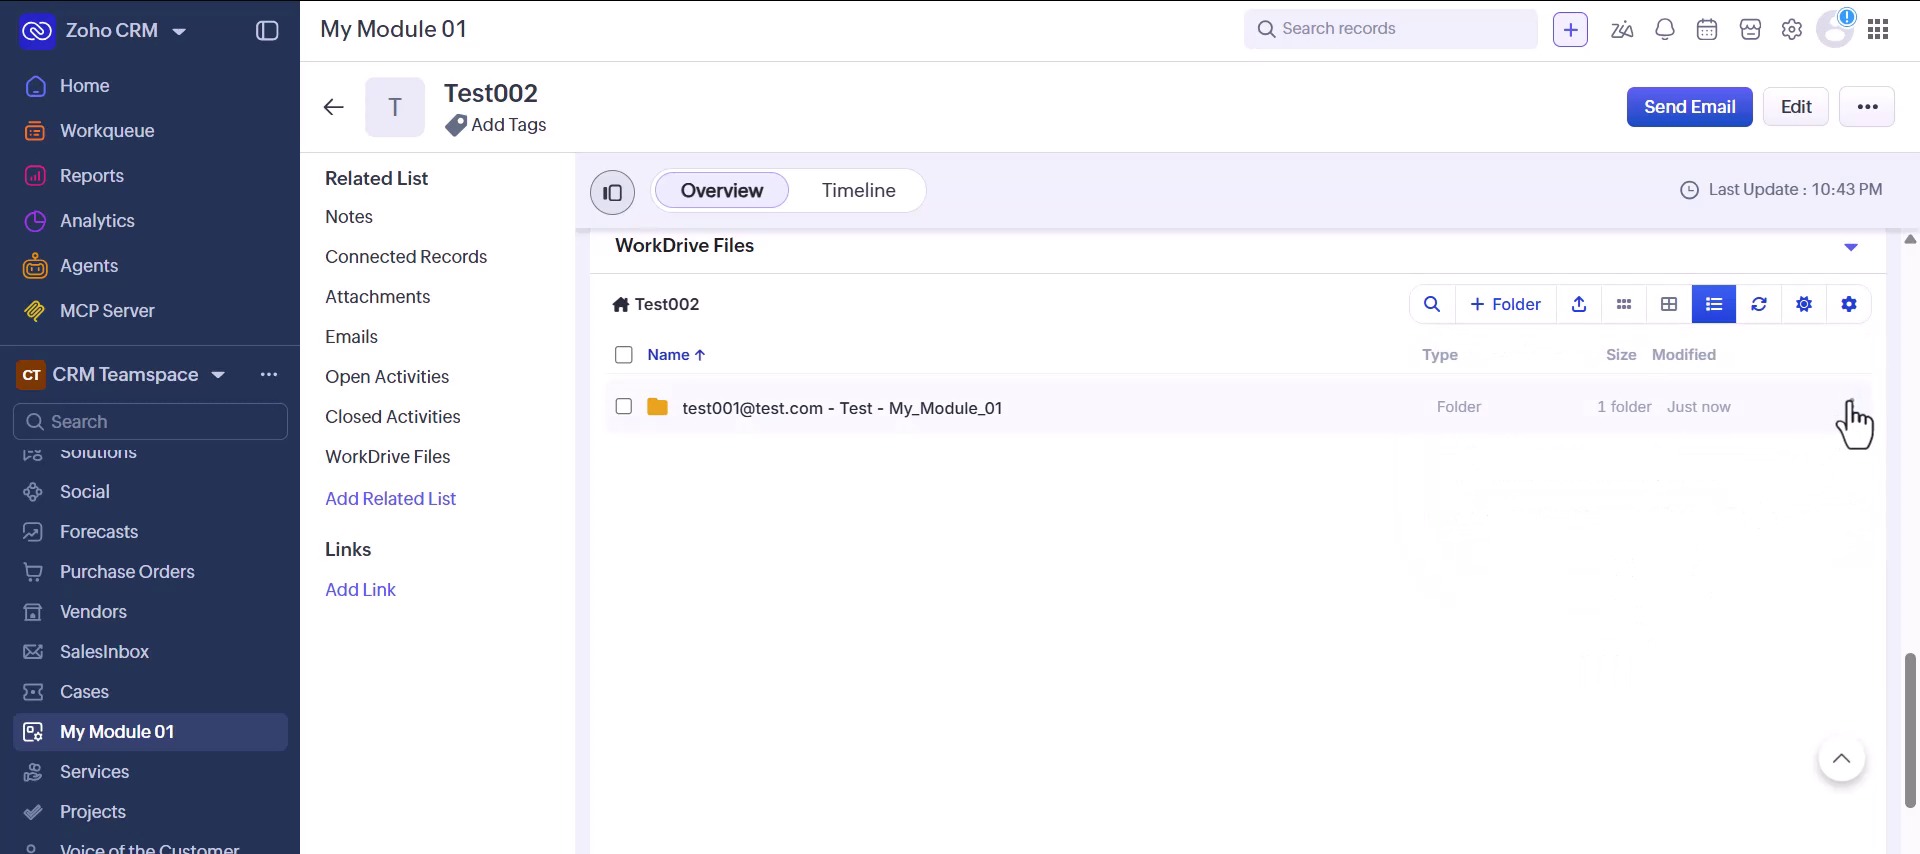
- Open WorkDrive Files in the related list. The folder should be there, with your subfolders inside it.
- Upload a file, and confirm it appears in Zoho WorkDrive in the team folder you chose during setup.
Worth one extra check: create a second record with the name-forming fields filled in differently, and look at what the folder is called. A field that is empty on a record cannot contribute a value to the name, and what you get instead is rarely what you intended.
Common problems and how to fix them
WorkDrive Files is not in the widget list
The related list is created when the extension’s settings page is opened, so it does not exist until someone has opened it at least once. Go back to Step 1, open Settings, wait for it to finish loading, then try Add Related List again.
The panel says the module is not set up yet
The related list is on the layout but the module has not been added inside the extension’s settings, or it has been switched off there. Step 2.
The panel loads but the record has no folder
Two usual causes. Either the record was created before the workflow rule existed – folders are made on creation, and nothing goes back for older records – or the rule is writing the folder id to a different field from the one Settings is reading. Open Settings and check the field name there matches the field on the record.
Some records get folders and others do not
Usually a layout problem. If the module has several layouts, the WorkDrive Folder Id field only lands on the standard one and waits under Unused Items on the rest. Records created on a layout without the field have nowhere to store the id.
The folder name has a field label in it instead of a value
That field was empty on the record when the folder was made. Either make it required on the layout, or leave it out of the folder name and use something that is always present.
The panel shows an old version of itself
Your browser is holding a cached copy. A hard refresh – Ctrl + Shift + R, or Cmd + Shift + R on a Mac – is all it takes. There is nothing to re-install.
Do you have to repeat this after an update?
No. This is the part that used to be the real cost of custom-module setup, and it is the part that went away.
The file manager updates itself, because it is served rather than installed. Your module settings, your folder naming, your workflow rule and the related list on the layout all stay exactly as you left them. Occasionally a release changes the underlying integration – new permissions, new automations – and then a package upgrade through Marketplace is needed; we say so explicitly in the release notes when that is the case. Even then, nothing on this page has to be done again.
Frequently Asked Questions
Do I have to do this for every module in Zoho CRM?
No. Leads, Contacts, Accounts and Deals are configured when the extension is installed. You only need these steps for custom modules and for standard modules the extension was not packaged for, and only for the ones you actually want a file manager on.
Can I use the same related list on several modules?
Yes – that is the point of it. WorkDrive Files is one related list that works on any module. Install it on each module’s layout, and give each module its own entry in Settings and its own workflow rule.
Do I still need to upload a zip in Developer Space?
No, and there is no longer a zip to upload. That flow, and the Index Page field that caused most of the trouble in it, belonged to versions before 9.0.
What happens to records that already existed?
They have no folder, because the workflow rule runs on creation. To give an old record a folder, edit and save it with a rule that also runs on edit, or create the folder from the record once and let the panel take over from there.
Where do the files actually live?
In your own Zoho WorkDrive, in the team folder you picked during setup. Nothing is copied to our servers or to any third party – the extension stores a folder id on the record and nothing else.
Can I change the folder naming later?
Yes, and it applies to folders created after the change. Existing folders keep the names they were given – the name is set once, when the folder is made.
If you would rather not do this yourself
Ten minutes a module is fine for two modules and less fine for twelve, and the folder-naming decisions are the kind that are cheap now and expensive later. If you would like us to set this up across your custom modules – or just to look over the naming before you commit to it – get in touch and we will take care of it.
Walkthrough video
How to Add the WorkDrive File Manager to a Custom Module in Zoho CRM
YouTube