Welcome to the WorkDrive in Zoho CRM documentation. WorkDrive in Zoho CRM is a powerful extension that helps you connect and manage Zoho WorkDrive directly within your Zoho CRM environment. It allows you to easily access, upload, organize, and manage files and documents without switching between different platforms.
With WorkDrive in Zoho CRM, you can streamline your document management workflow and keep your CRM records and WorkDrive files connected in one place. The extension helps you improve productivity, simplify file sharing, and manage important documents more efficiently.
This documentation provides step-by-step guidance on how to set up and use WorkDrive in Zoho CRM, including installation, configuration, file management, and other essential features.
Process of installation
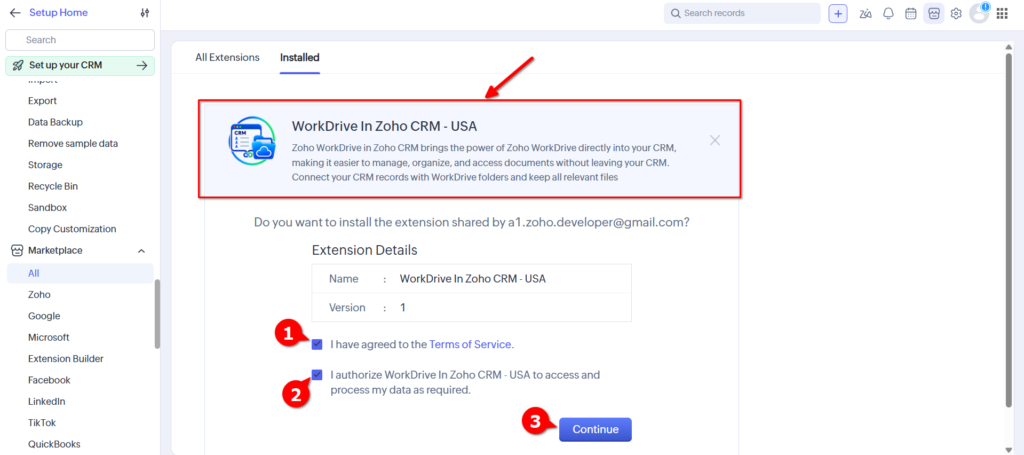
First, go to the Zoho Marketplace and search for WorkDrive in Zoho CRM. Alternatively, you can click here to access the extension directly. This will take you directly to the installation page. Next, review and accept the Agreements, then click Continue.
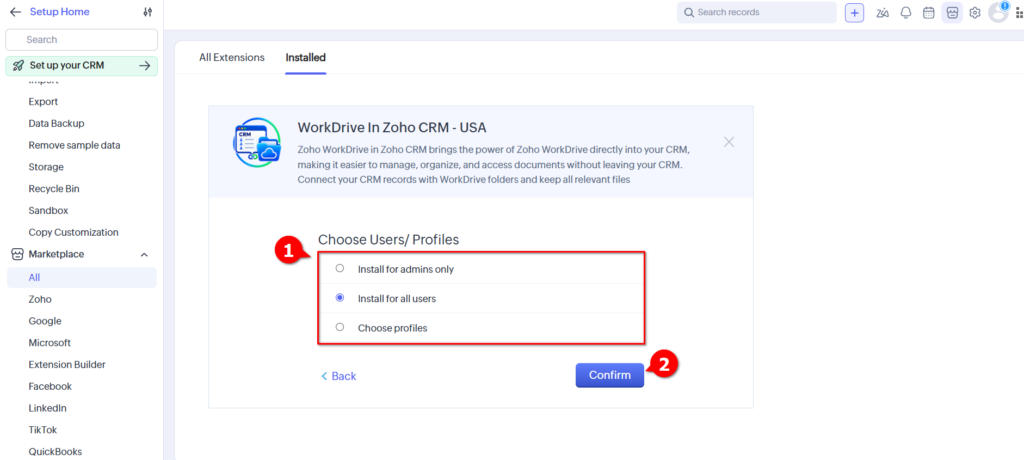
Choose Users/Profiles
Select the users or profiles for whom you want to install the extension. You can choose from the following options:
- Install for admins only – Install the extension for administrators only.
- Install for all users – Install the extension for all users in your Zoho CRM organization.
- Choose profiles – Select specific profiles that should have access to the extension.
After selecting the appropriate option, click Confirm to proceed.
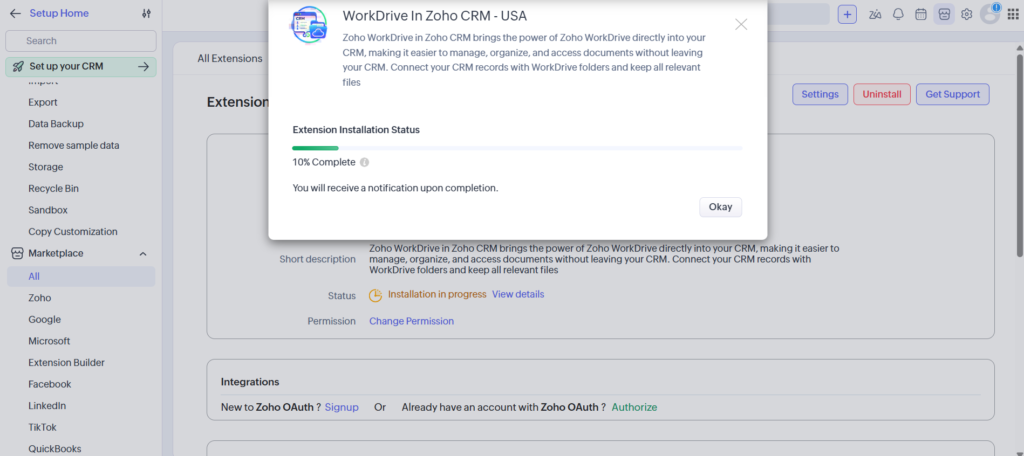
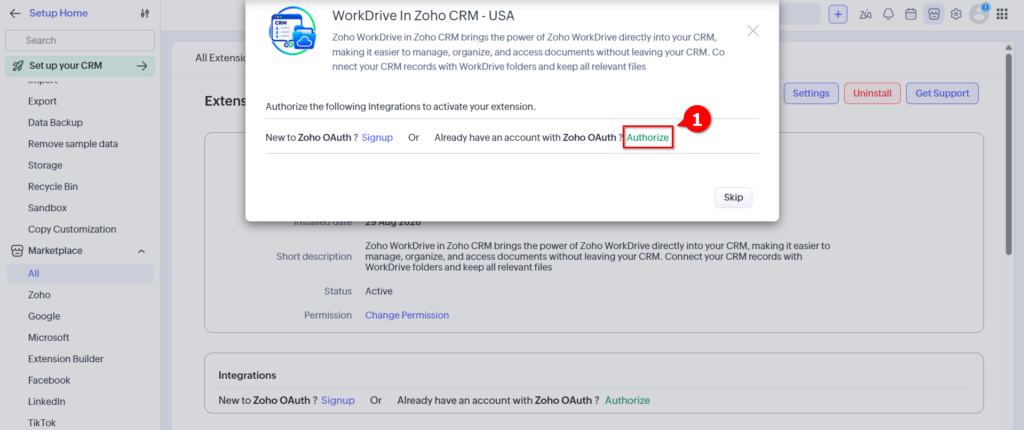
The installation will now begin. Once the installation is complete, you’ll need to authorize your Zoho account to start using the extension.
Click the Authorize button to begin the authorization process with your Zoho account.
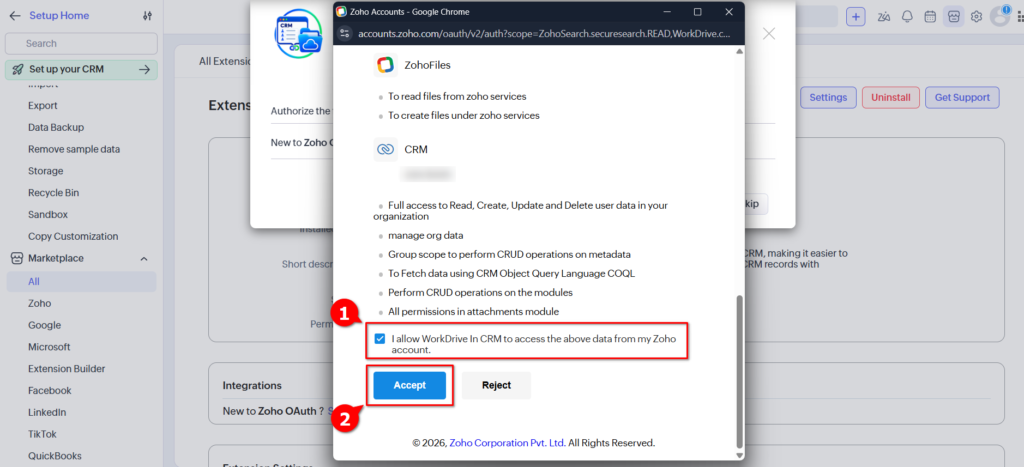
A new window will appear. Review the scopes and permissions, then scroll down and select “I allow WorkDrive in CRM to access the above data from my Zoho account.”
Finally, click Accept to complete the authorization process.
Congratulations! You have successfully installed the WorkDrive in Zoho CRM extension.
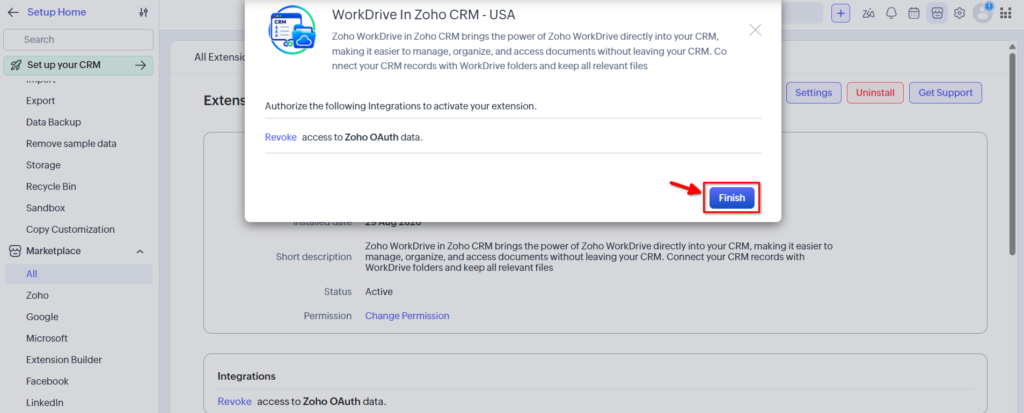
After successful authorization, click the Finish button. You will then be automatically redirected to the Settings page.
Root Folder Identification and Configuration
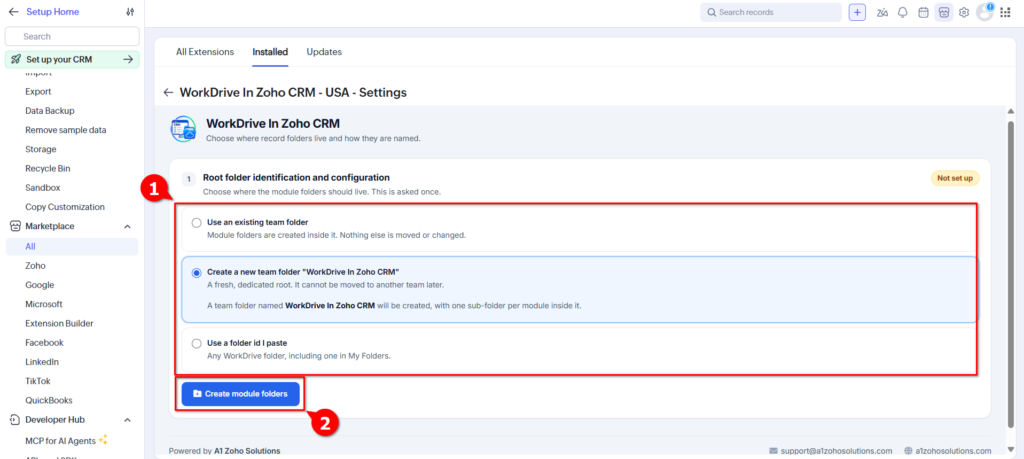
From the Settings page, you need to configure the root folder where the module folders will be created. This setup is required only once.
You can choose from the following options:
- Use an existing team folder – Select an existing WorkDrive team folder as the root folder. The module folders will be created inside it. No existing files or folders will be moved or modified.
- Create a new team folder “WorkDrive in Zoho CRM” – Create a new dedicated team folder as the root folder. A team folder named WorkDrive in Zoho CRM will be created, with a separate sub-folder for each CRM module. Once created, this root folder cannot be moved to another team.
- Use a folder ID I paste – Enter the ID of any WorkDrive folder to use as the root folder. This can be a folder from My Folders or a Team Folder.
After selecting your preferred option, click Create Module Folders to create the required module folders inside the selected root folder. This will create a new folder in your Team Folder named WorkDrive in Zoho CRM.
Module Settings
In the Module Settings section, you can configure how folders will be created and named for each Zoho CRM module.
Each module gets its own folder. You can configure folder settings for modules such as:
- Leads
- Contacts
- Accounts
- Deals
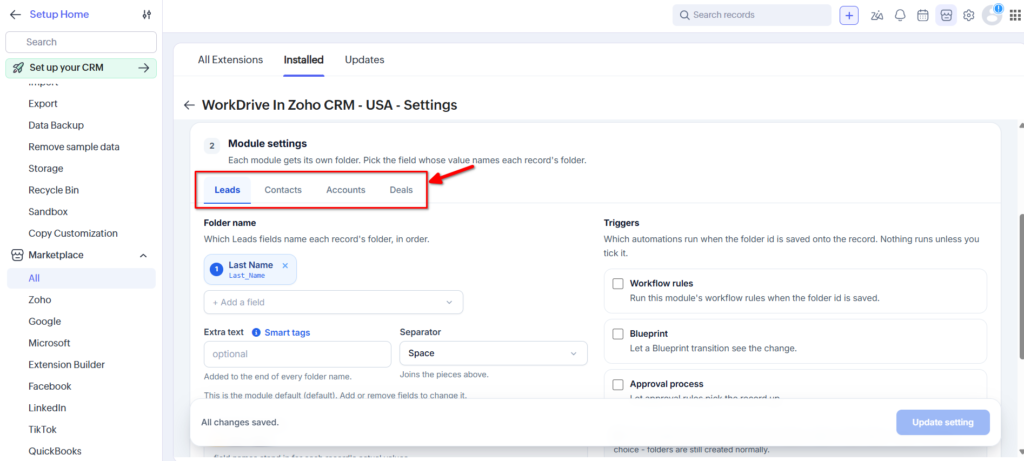
Folder Name
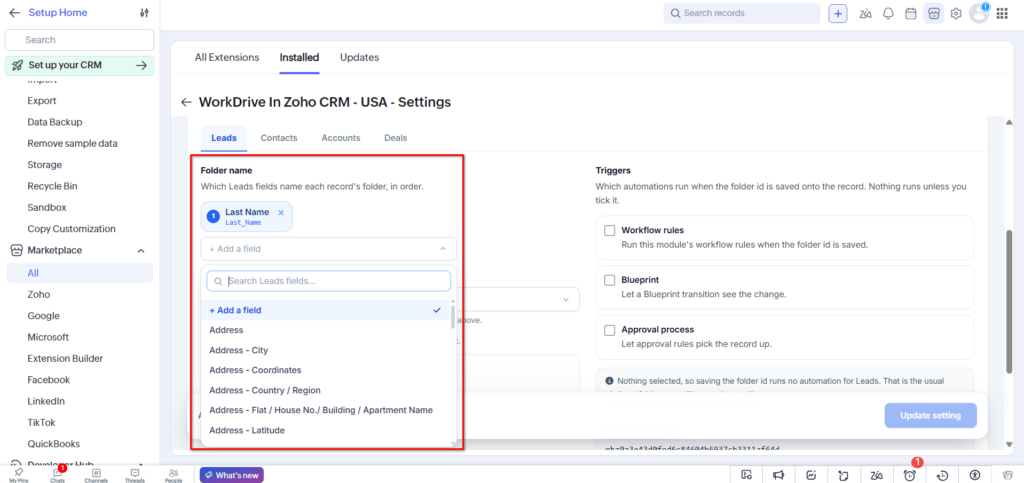
Select the CRM field whose value will be used to name each record’s folder.
For example, for the Leads module, you can select Last Name as the folder name field. The folder will then be automatically named using the value stored in the Lead’s Last Name field.
You can also:
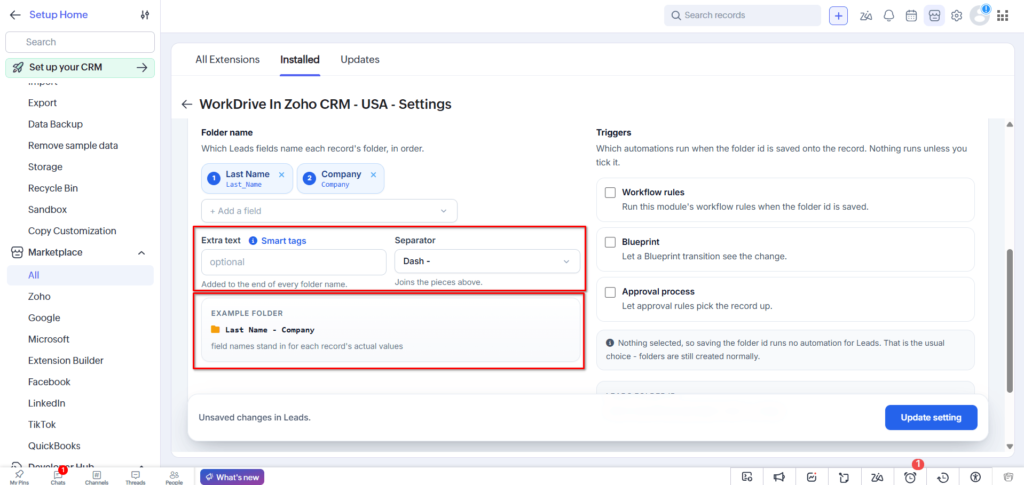
- Click + Add a field to include additional fields in the folder name.
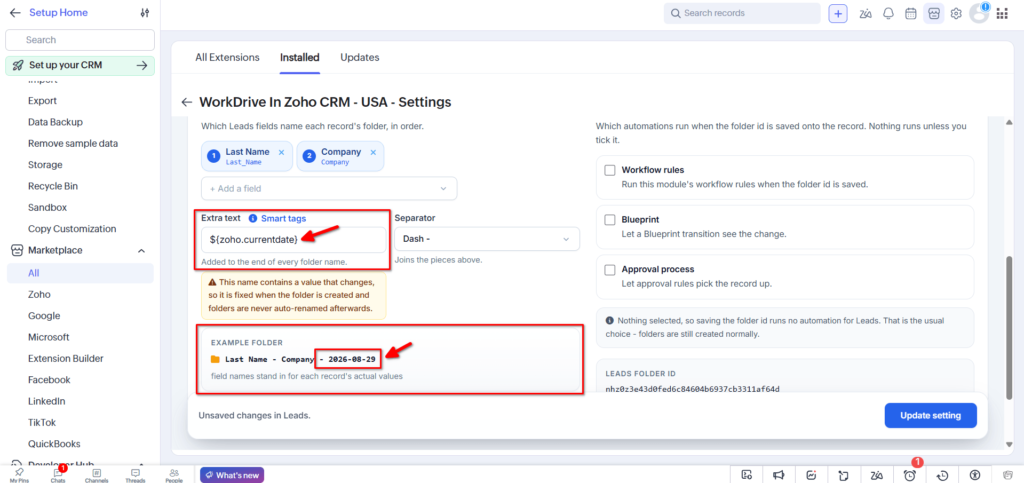
- Add Extra Text to append custom text to every folder name.
- Select a Separator to define how multiple values are joined.
The Example Folder section shows a preview of how the folder name will appear using the selected fields.
Smart Tags
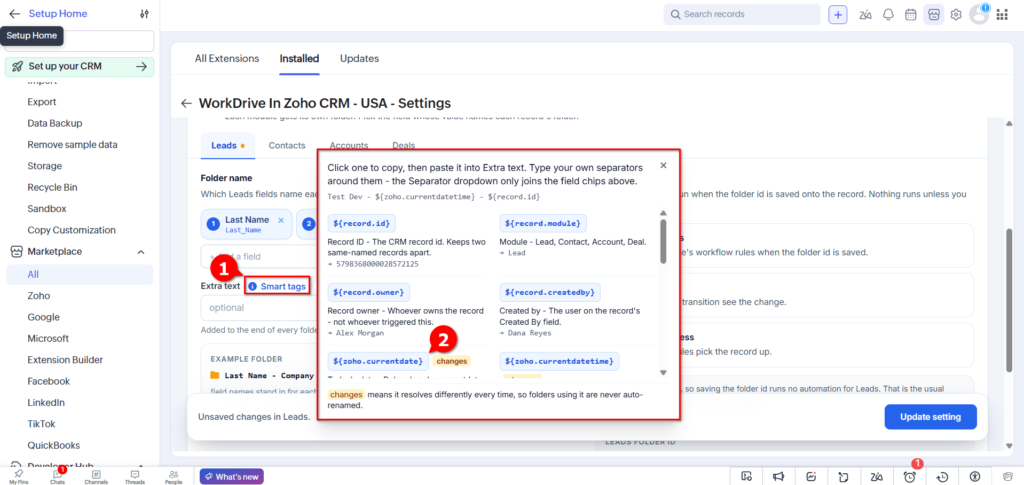
You can use Smart Tags to dynamically generate folder names using CRM record information and system values.
Available smart tags include:
${record.id}– The CRM record ID. Useful for distinguishing records with the same name.${record.module}– The CRM module name, such as Lead, Contact, Account, or Deal.${record.owner}– The owner of the CRM record.${record.createdby}– The user who created the CRM record.${zoho.currentdate}– The current date.${zoho.currentdatetime}– The current date and time.${zoho.currenttime}– The current date and time returned by Deluge.${date.year}– The current four-digit year.${date.month}– The current two-digit month.${date.day}– The current two-digit day.${zoho.loginuser}– The user associated with the current authorization/API execution.${zoho.loginuserid}– The email address associated with the current authorization/API execution.${zoho.adminuser}– The extension owner’s user name.${zoho.adminuserid}– The extension owner’s email address.
The values of Smart Tags are resolved dynamically when the folder is created. Smart Tags marked as dynamic may produce different values each time, so folders using these tags are not automatically renamed when the underlying value changes.
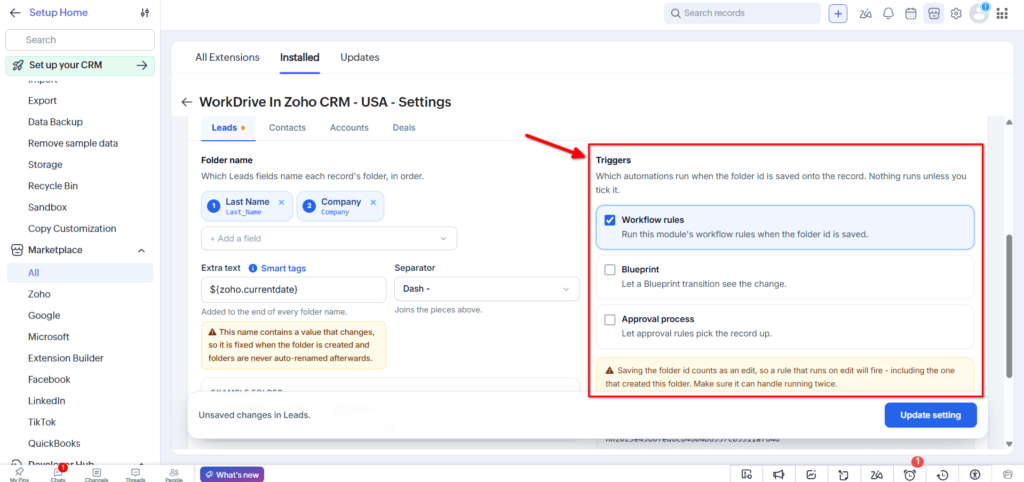
Triggers
You can choose whether saving the WorkDrive folder ID to a CRM record should trigger any Zoho CRM automation.
Available options are:
- Workflow Rules – Run the module’s workflow rules when the folder ID is saved.
- Blueprint – Allow a Blueprint transition to detect the change.
- Approval Process – Allow approval rules to process the record.
If no trigger is selected, saving the folder ID will not run any CRM automation. This is the default behavior, while the WorkDrive folder will still be created normally.
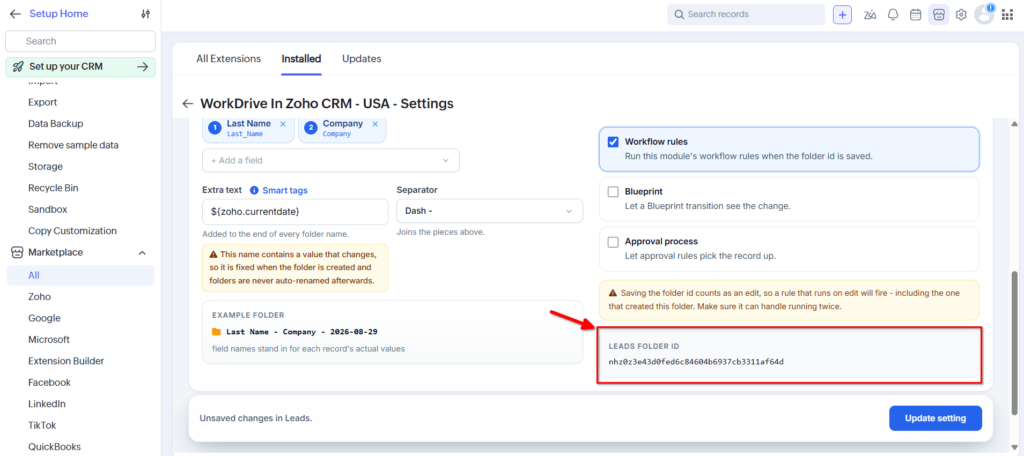
Module Folder ID
Each module also has a corresponding Folder ID field. This field stores the WorkDrive folder ID associated with the CRM record and allows the extension to maintain the connection between the CRM record and its WorkDrive folder.
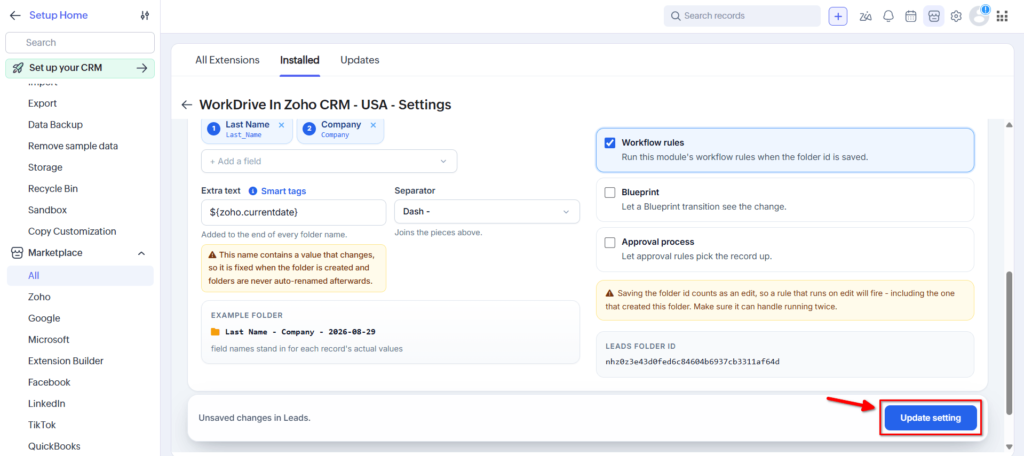
After configuring your desired settings for each module, click the Update Settings button to save your changes.
After configuring the settings for each module, navigate to any of the Leads, Contacts, Accounts, or Deals modules and create a new record to test the integration.
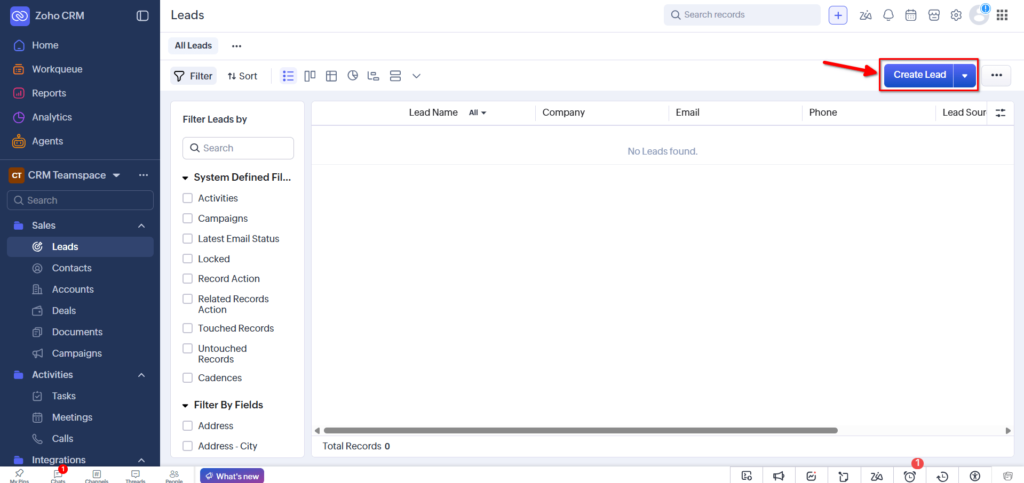
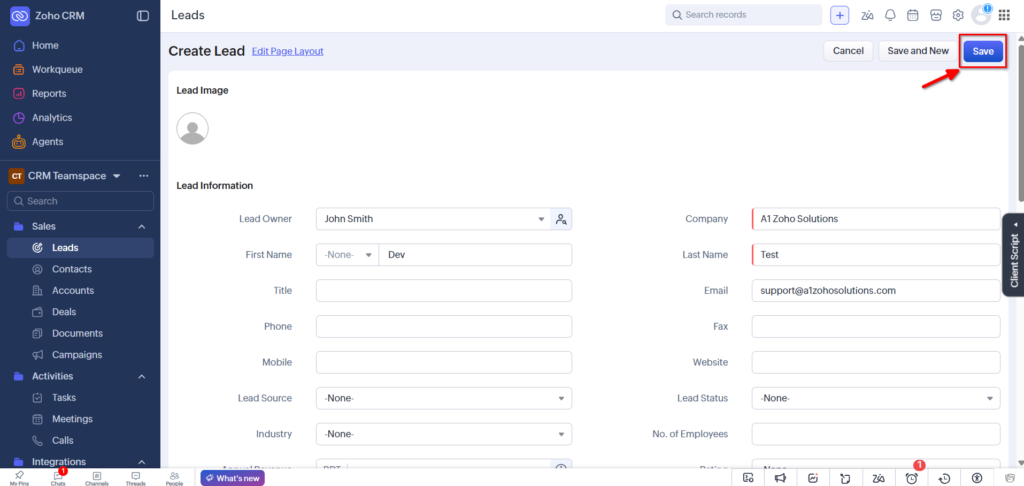
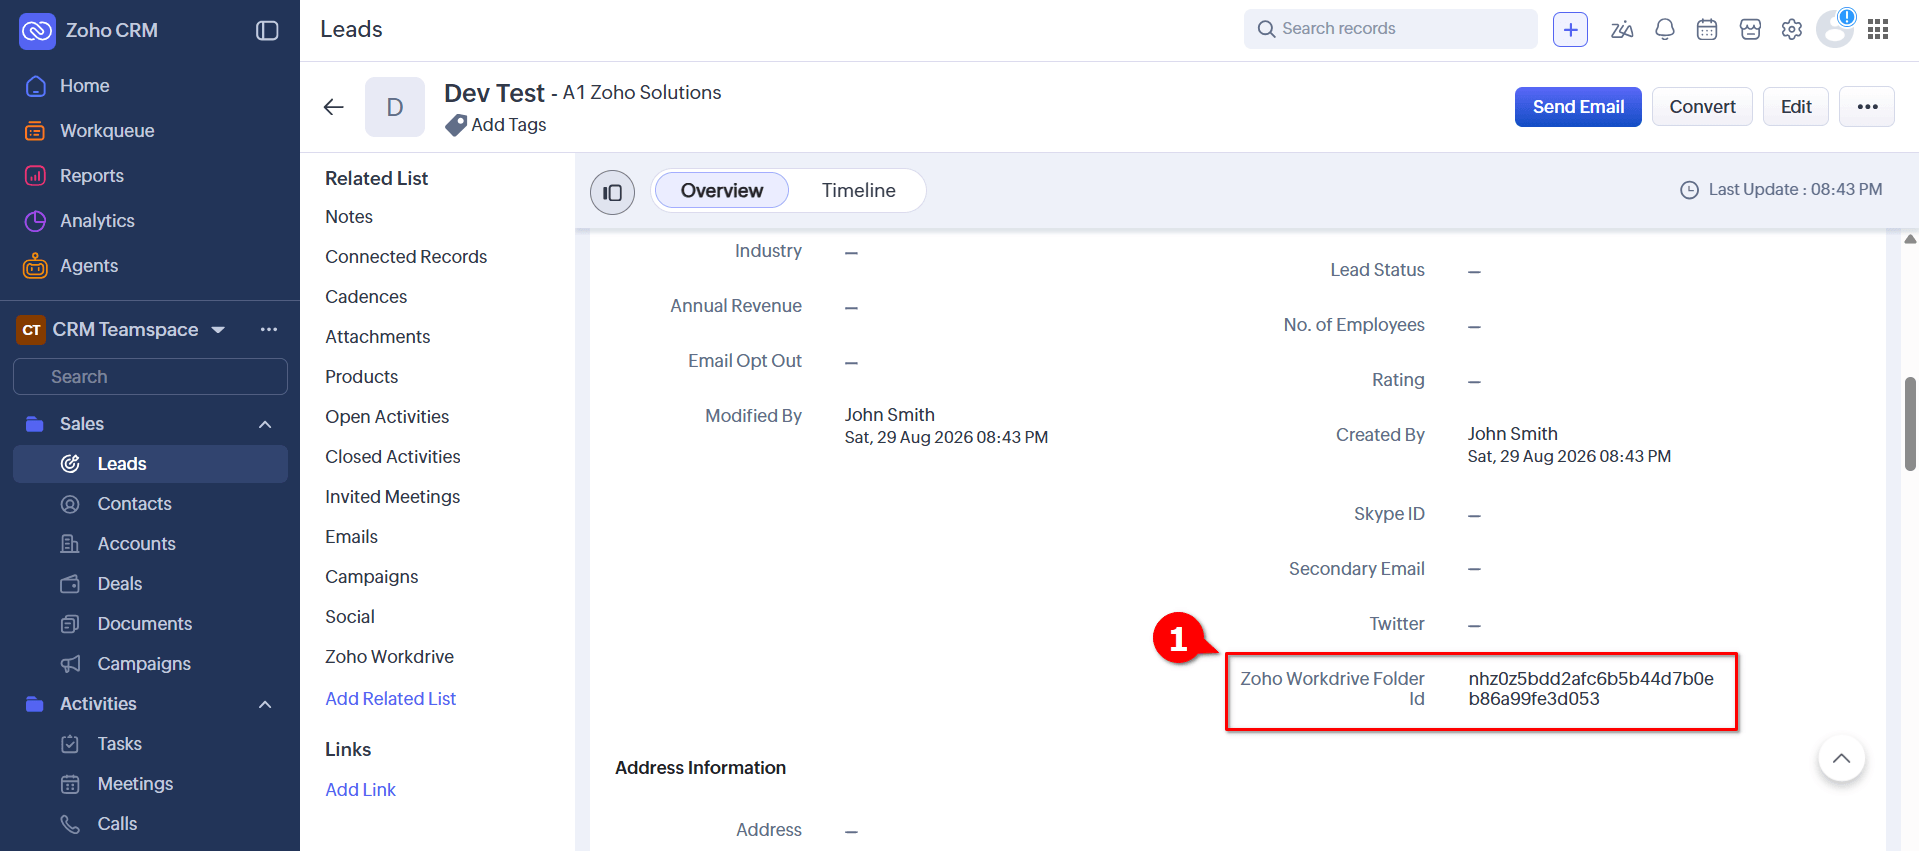
After creating a Lead, reload the page and locate the Zoho WorkDrive Folder ID field. You will find the WorkDrive folder ID associated with this record in this field.
Important: Do not delete or modify this folder ID, as it is used to maintain the connection between the CRM record and its corresponding WorkDrive folder.
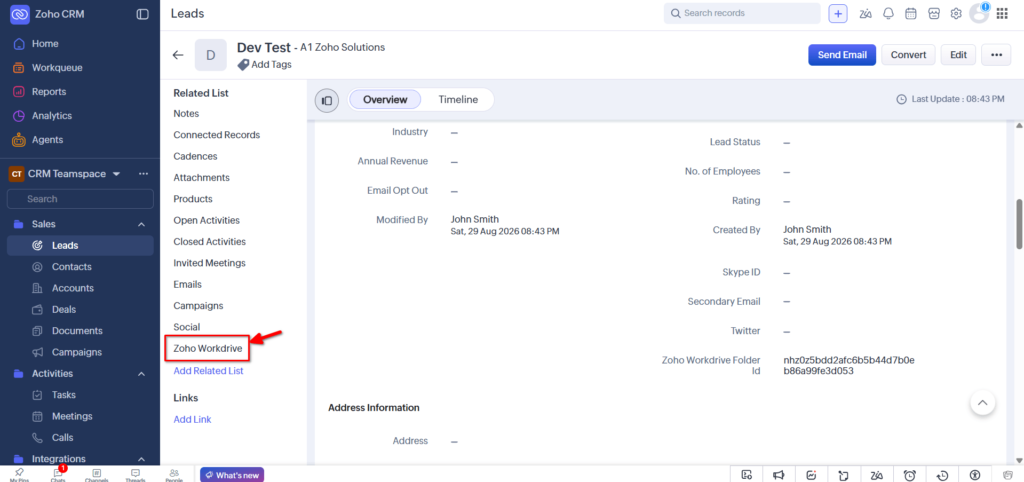
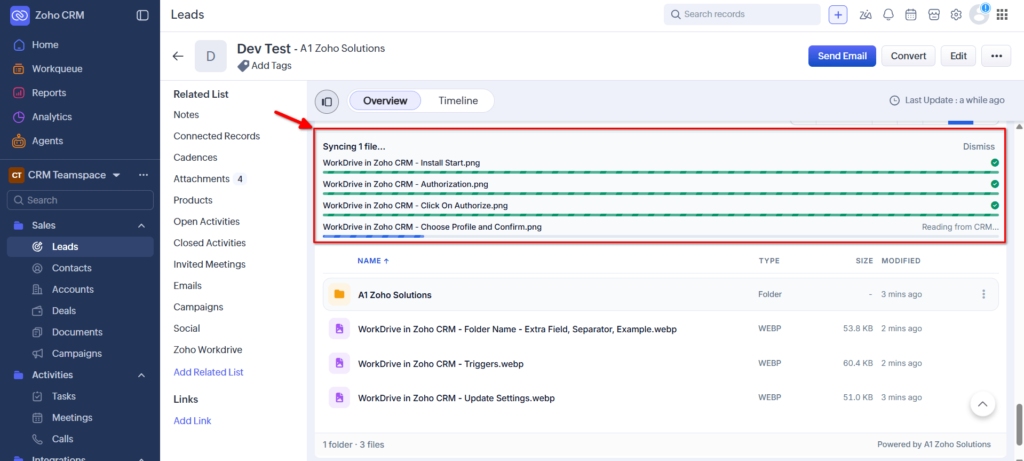
From the Related List, locate Zoho WorkDrive and click on it. You will then be redirected to the Zoho WorkDrive widget page.
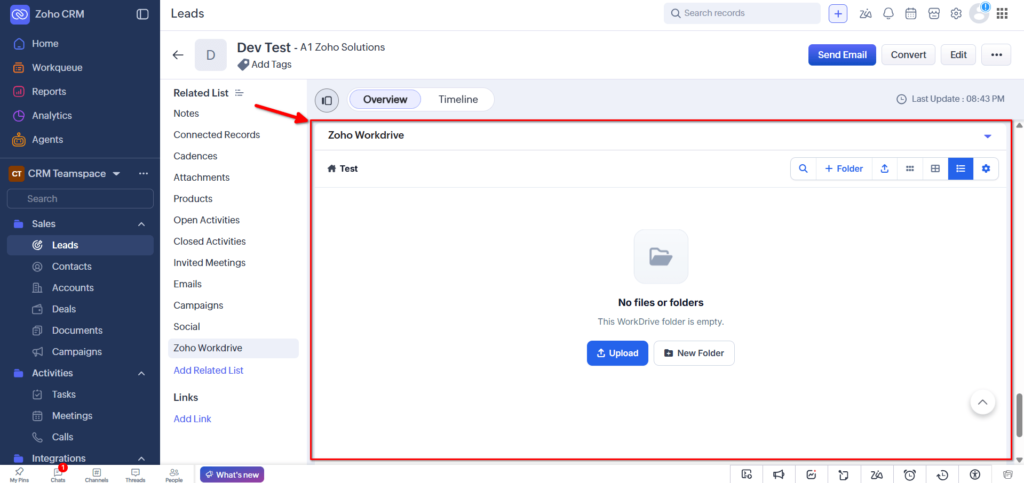
Zoho WorkDrive File Manager
After opening the Zoho WorkDrive widget, you will see the File Manager, where you can manage your WorkDrive files directly from Zoho CRM.
From the File Manager, you can:
- Search for files and folders.
- Create new folders to organize your files.
- Upload files directly to WorkDrive.
- Change the view to display your files according to your preference.
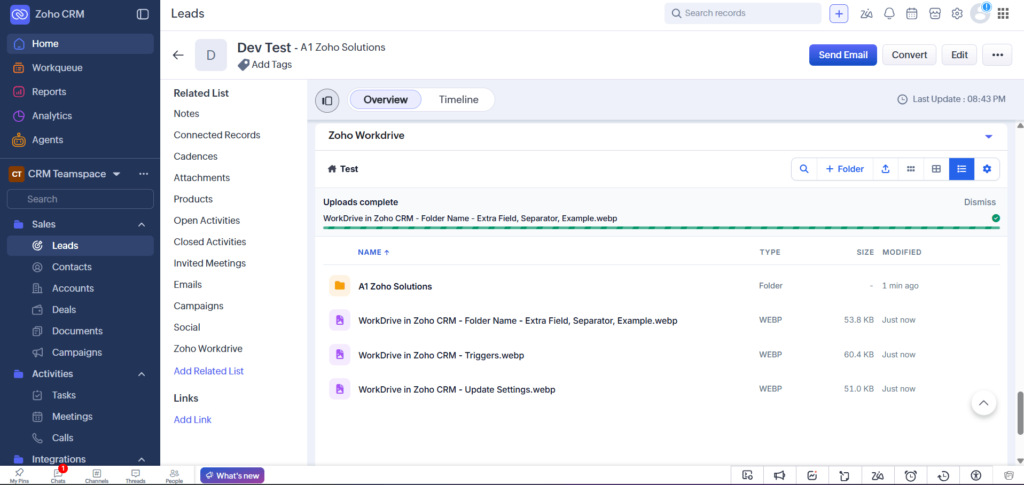
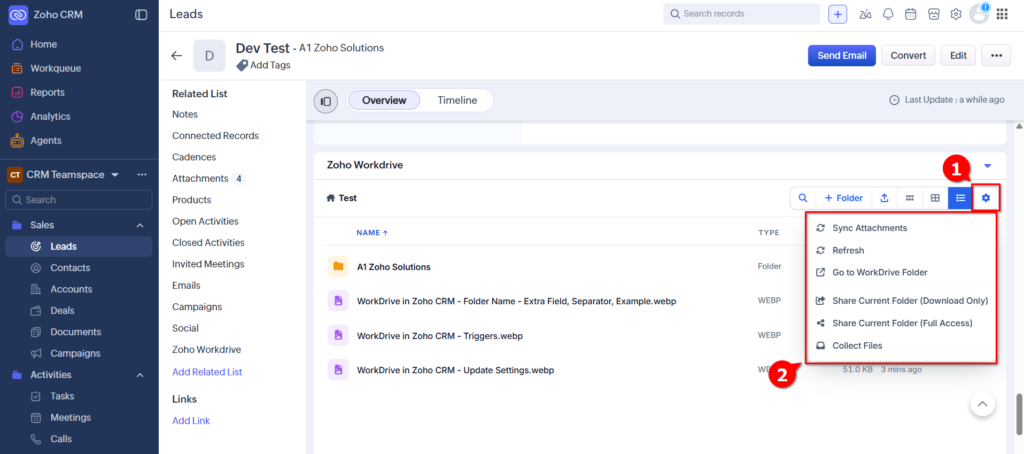
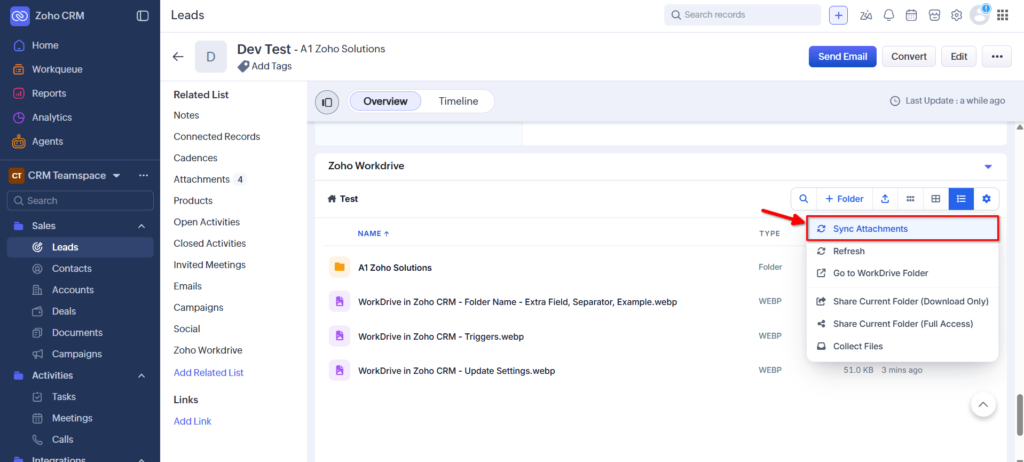
You will also find a Settings button with additional options, including:
- Sync Attachments – Sync CRM attachments with the corresponding WorkDrive folder.
- Refresh – Refresh the file and folder list to display the latest changes.
- Go to WorkDrive Folder – Open the corresponding folder directly in Zoho WorkDrive.
- Share – Share files and folders with other users.
- Collect – Collect files or folders using WorkDrive’s collection functionality.
Congratulations! You have successfully installed, configured, and used the WorkDrive in Zoho CRM extension.
Walkthrough video
How to Set Up and Use WorkDrive in Zoho CRM
YouTube