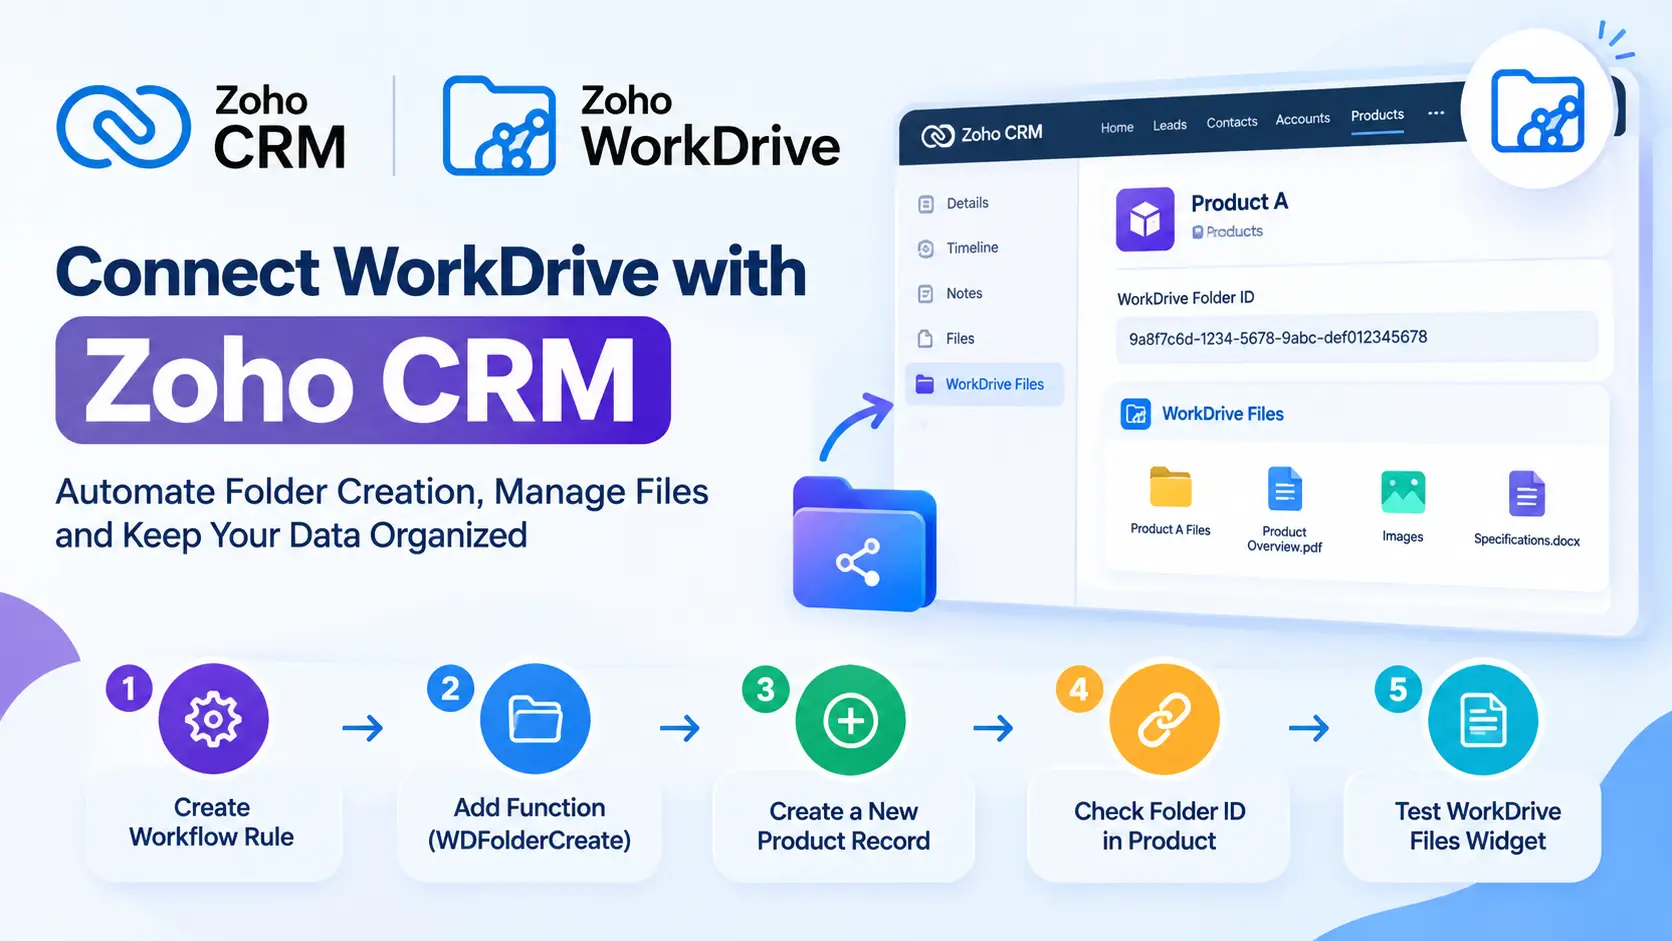
If you use the WorkDrive In Zoho CRM extension, you already know it gives a file manager on Leads, Contacts, Accounts and Deals. You upload files right there on the record. No extra tab, no separate login to WorkDrive.
But if you built your own module – say Projects, Vendors, or Site Visits – that file manager does not show up on its own. You have to add it yourself, one time, for each module. This guide shows the exact steps, in order.
This is not something broken in the extension. It is how Zoho Marketplace extensions work in general. We explain why below, then walk through the full setup.
Quick Summary
- Who can do this: Only a CRM administrator. Regular users don’t have access to Developer Space.
- When you need it: Only for modules you created yourself, or any standard module the extension was not built for. Leads, Contacts, Accounts and Deals already have the file manager, so skip those.
- Time needed: About 15 to 20 minutes per module, once you know the steps.
Why the Extension Cannot Add This on Its Own
A Marketplace extension decides which modules it works with at the time it is packaged and published, not later when you install it. Your custom module did not exist when the WorkDrive In Zoho CRM extension was built. So the extension has no way to know about it, then or now.
This means the extension cannot place its file manager on your module by itself. What you can do instead is add a copy of the same file manager yourself. It reads the same settings and shows files from the same WorkDrive folders. The only real difference is that this copy belongs to your organisation, and not to the extension.
Part 1: Configure the Module in the Extension’s Settings
Before you touch widgets or workflow rules, you need to tell the extension which module to work with. Leads, Contacts, Accounts and Deals don’t need this – they come already configured when you install the extension. Your own module does.
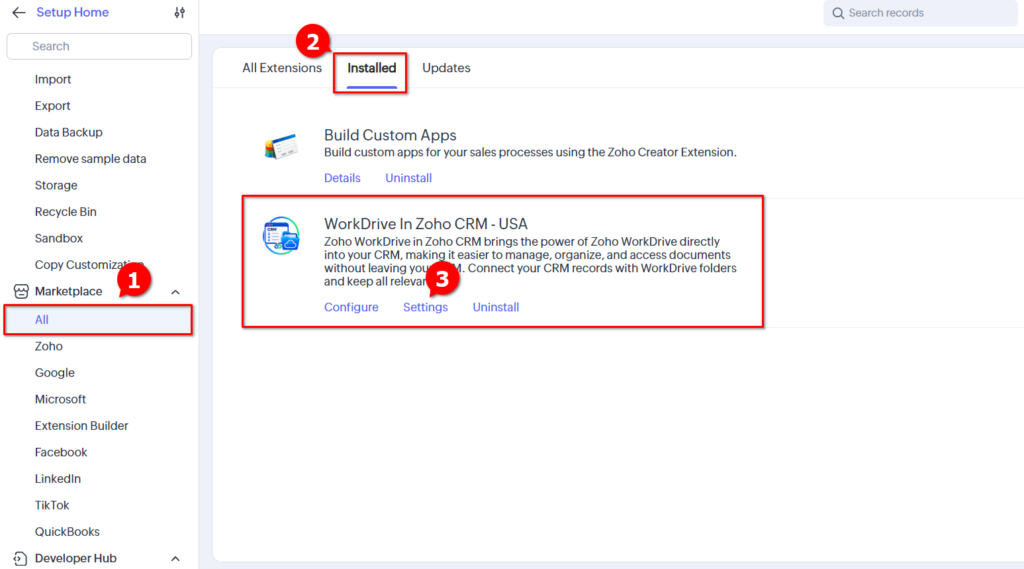
- Go to Marketplace › Installed, and find WorkDrive In Zoho CRM in the list.
- Click Settings on the extension.
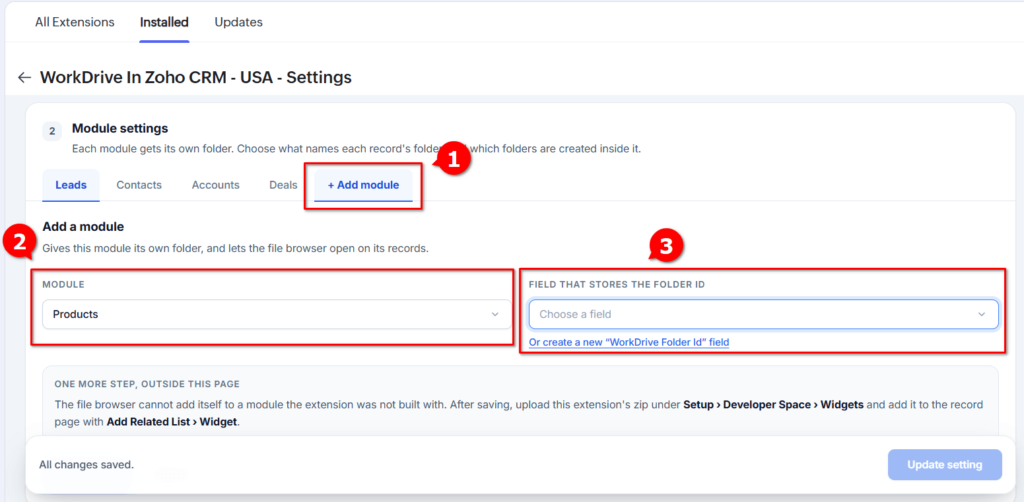
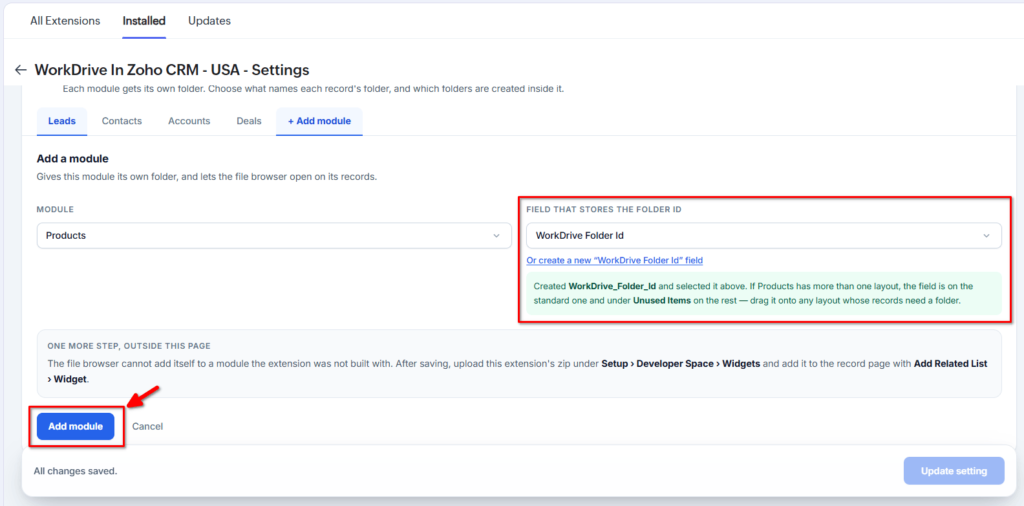
- On the Settings page, click Add Module.
- Choose your Module, then choose the Field that will store the folder ID. If you don’t already have a field for this, you can create a new WorkDrive Folder Id field right here instead – the simpler option if you don’t have a dedicated field yet.
- Click Add Module again to save.
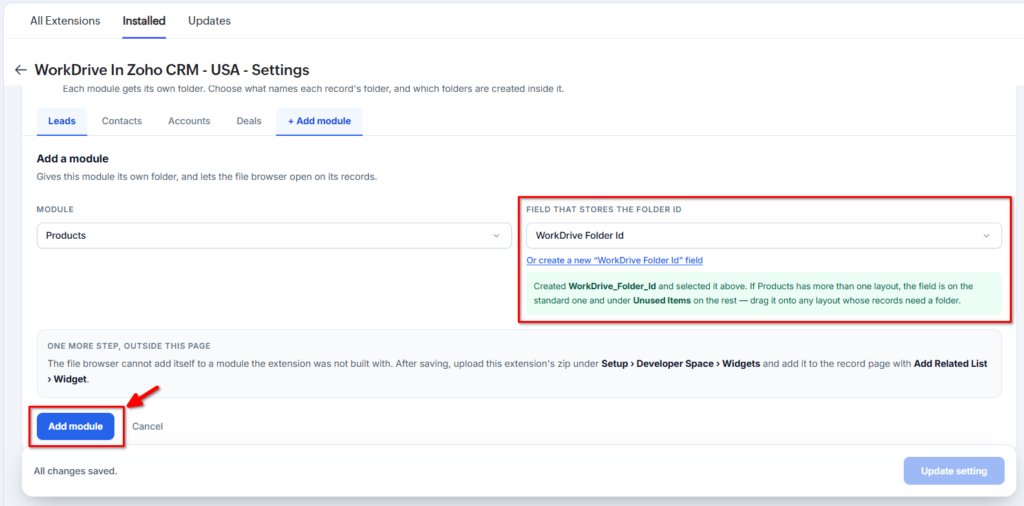
Your module now shows up next to the modules that came pre-added with the extension.
Next, you need to set up folder naming and structure for this module. We’ve written a separate, full guide for that – see the WorkDrive In Zoho CRM documentation.
Once that part is done, you’re ready to move on to the widget – installing the file manager on this module’s related list, which the rest of this guide covers.
Part 2: Upload the File Manager as a Widget
Note: This is a one-time step for the widget itself. If A1 Zoho Solutions releases an update to the file manager later, you don’t need to repeat Part 2 from scratch – you just come back to this same widget and replace the zip file. See “What Happens When the Extension Updates” below.
Step 1: Open Developer Space
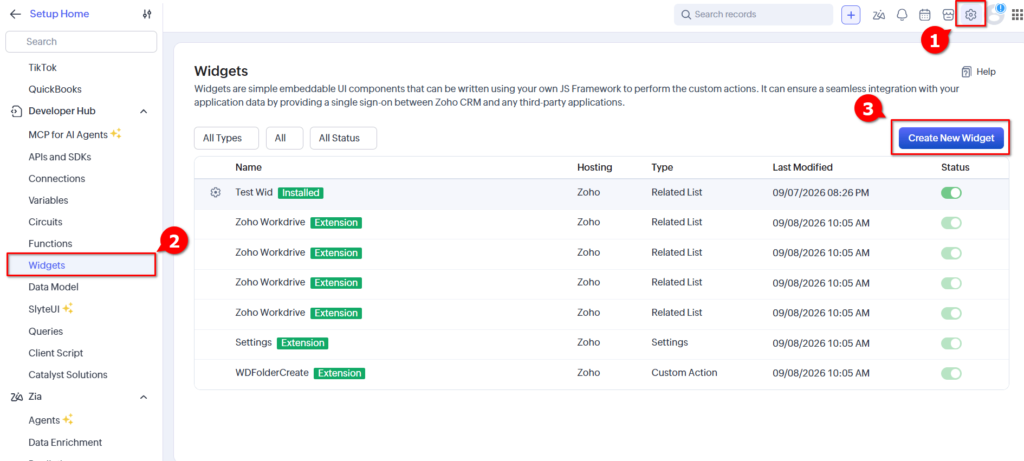
Go to Setup › Developer Space › Widgets, then click Create Widget in the top right corner.
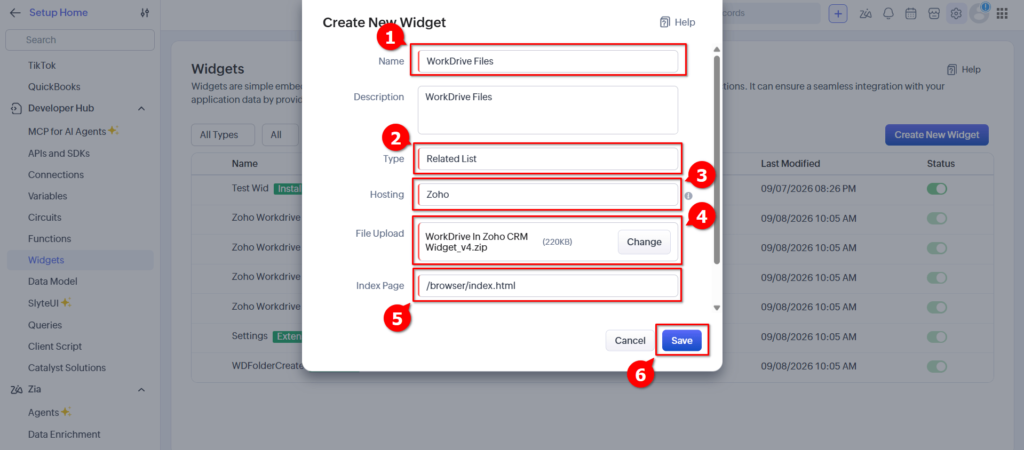
Step 2: Fill In the Widget Details
| Field | What to Enter |
|---|---|
| Widget Name | Anything your team will recognise – this name becomes the heading on the record page. “WorkDrive Files” works well. |
| Type | Related List |
| Hosting | Zoho |
| File Upload | The widget zip file workdrive-in-zoho-crm-widget_v4.zip |
| Index Page | /browser/index.html |
Step 3: Get the Index Page Right
This one field causes most of the problems people run into. Read this part carefully.
Type or copy: /browser/index.html. Do not type /app/browser/index.html.
When Developer Space unpacks your zip file, it already treats the app/ folder as the starting point. If you add app/ again in the Index Page field, the file manager will open but show “Page Not Found” inside it. It looks like the upload failed. It did not – the path is just wrong.
If you have set up widgets in Sigma before, keep this in mind: Sigma works the other way around and does want the app/ prefix. The two tools don’t follow the same rule, and that is exactly what trips people up.
Step 4: Save
Click Save. Your widget is now ready to be placed on a record page.
Part 3: Add the Widget to the Record Page
Note: Do this part for every module where you want the file manager to show up. Part 2 (uploading the widget) is a one-time task, but Part 3 (adding it as a related list) needs to be repeated separately on each module’s layout.
Here’s how to do it:
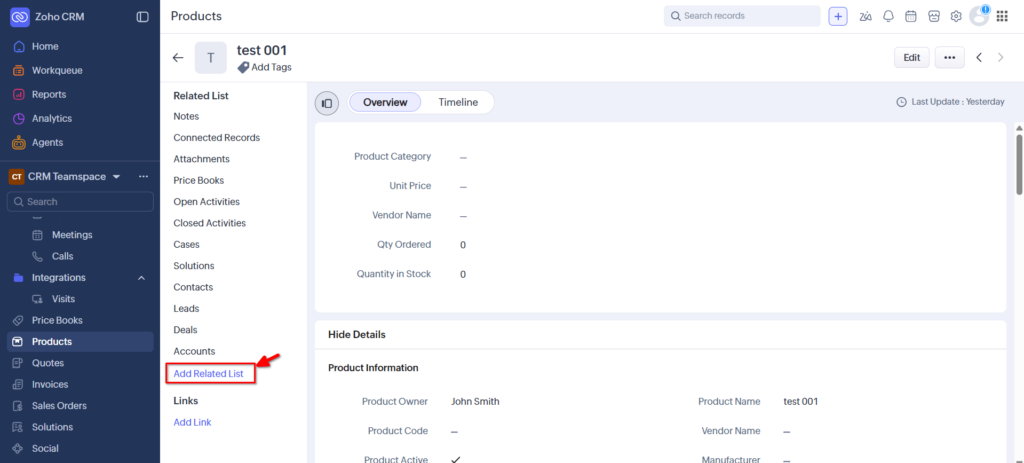
- Open any record in your module.
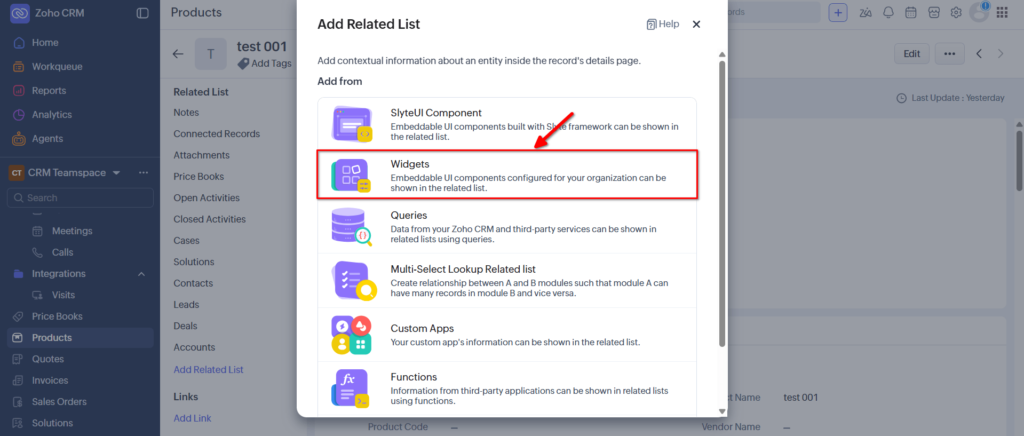
- In the Related List panel on the left side, click Add Related List.
- Choose Widgets.
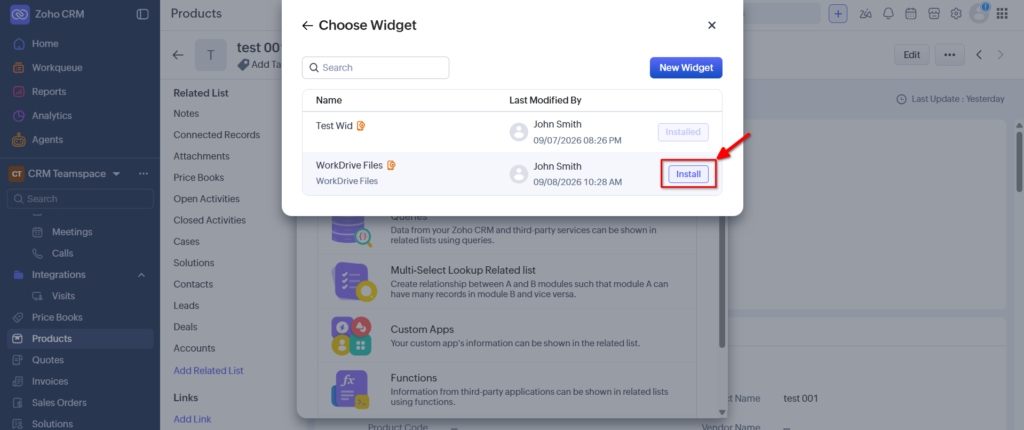
- Click the Install button on the widget you just created.
Part 4: Create a Workflow to Automatically Create the WorkDrive Folder
After adding the widget to the record page, create a workflow that automatically creates a WorkDrive folder when a new Product is created.
Step 1: Open Workflow Rules
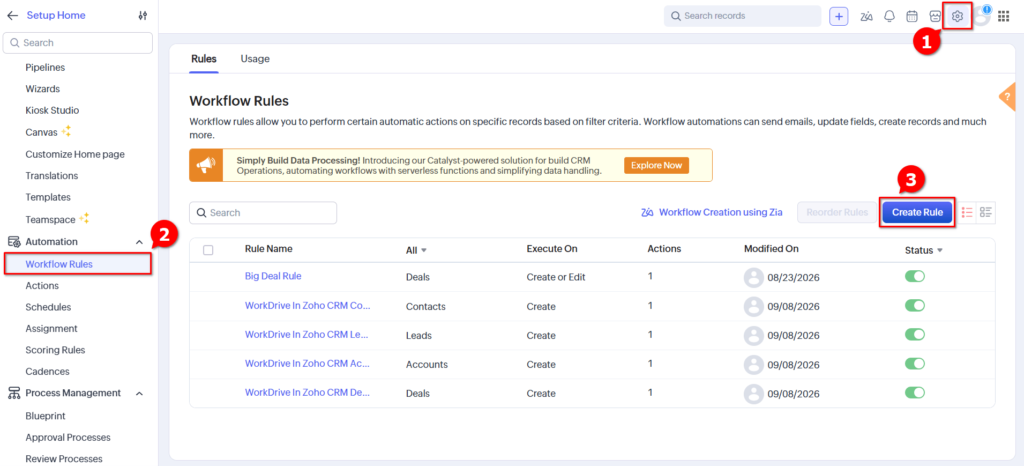
- Go to Zoho CRM › Setup › Automation › Workflow Rules.
- Click Create Rule.
Step 2: Select the Module
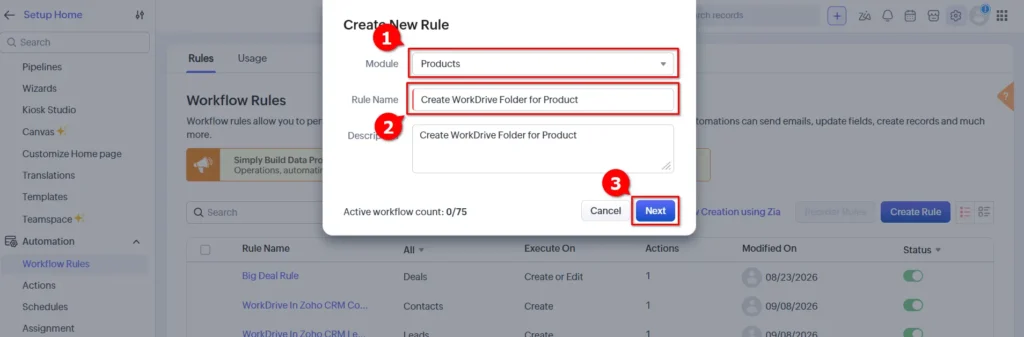
- Choose the module where you added the WorkDrive integration.
- For this example, select Products.
- Enter a name for the workflow rule, such as:
Create WorkDrive Folder for Product - Click Next.
Step 3: Set the Workflow Trigger
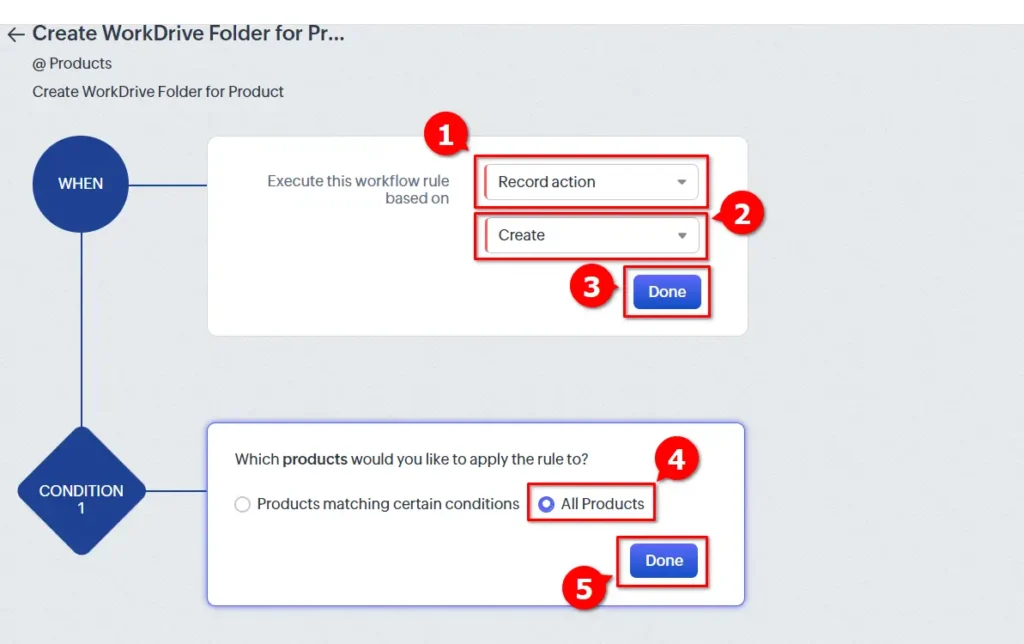
- Under Execute this workflow rule based on, select: Record Action
- Then select: Create
- Click Next.
Step 4: Choose Which Records Should Trigger the Workflow
- Under Which Products would you like to apply the rule to?, select: All Products
- Click Done.
Step 5: Add the Function
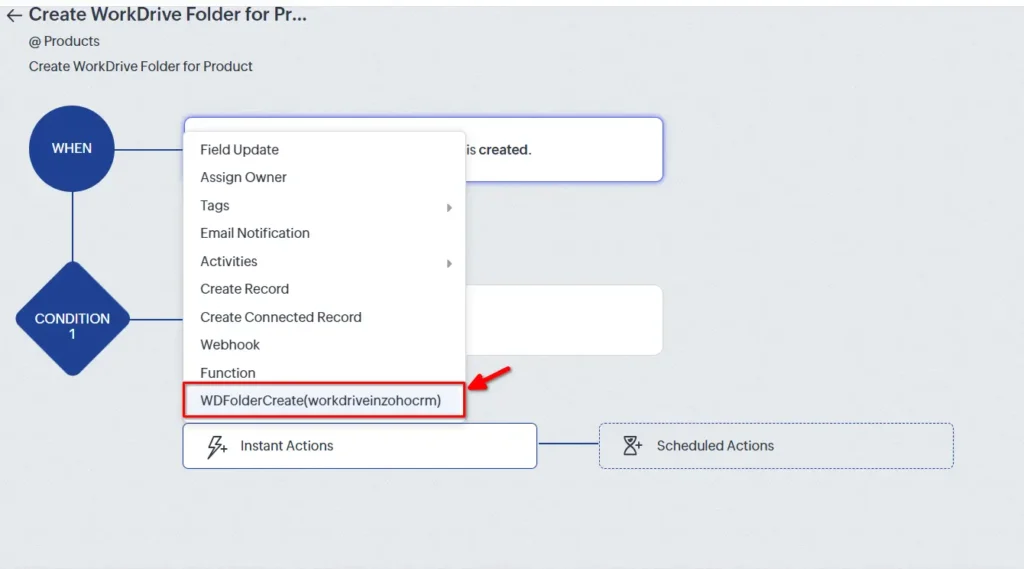
- Under Instant Actions, click Add › Function.
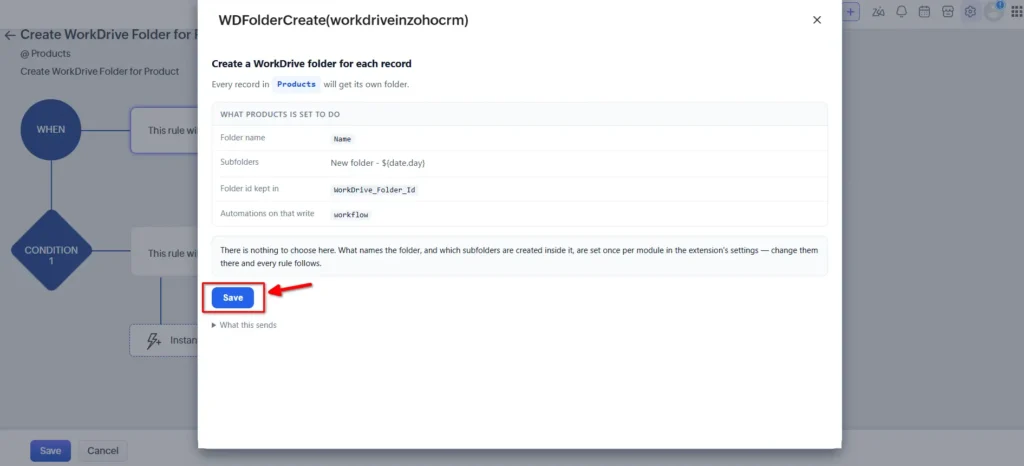
- Select the function:
WDFolderCreate(workdriveinzohocrm) - Click Save.
Step 6: Name the Instant Action
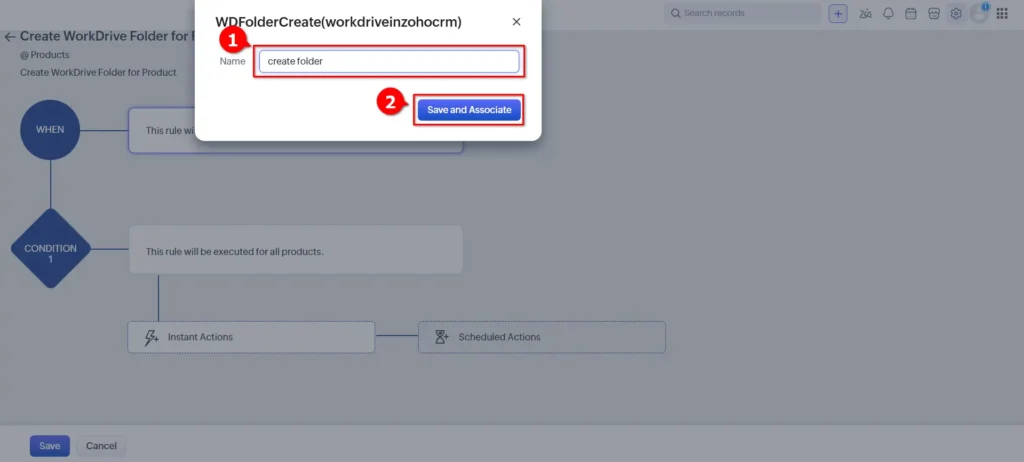
- Give the function action a clear name, for example:
Create folder - Then click Save and Associate.
Your workflow is now configured.
Part 5: Test If the File Manager Is Working
Now test the complete setup.
Step 1: Create a New Product
- Go to the Products module and create a new Product record.
- Save the record.
Step 2: Check the WorkDrive Folder ID
- Open the newly created Product and check the field where the WorkDrive Folder ID is stored.
- The field should now contain the WorkDrive Folder ID created by the workflow.
- If the field is updated correctly, it means the workflow successfully created and associated the WorkDrive folder with the Product.
Step 3: Check the WorkDrive Files Widget
- Open the WorkDrive Files Widget on the Product record.
- The widget should now load the WorkDrive folder associated with that Product.
- You can then test uploading, viewing, and managing files from the widget.
Expected result: New Product › Workflow Runs › WorkDrive Folder Created › Folder ID Saved › WorkDrive Files Widget Loads the Folder
Common Problems and How to Fix Them
The file manager shows “Page Not Found”
Your Index Page field has the wrong path. Edit the widget and set Index Page to /browser/index.html, without app/ in front.
The file manager says “Module isn’t set up yet”
This means the module has not been added inside the extension’s Settings yet, or the settings did not load properly. Go to Settings and add the module (see Part 1 above).
The file manager loads, but the record has no folder
Two possible reasons. Either the record was created before your workflow rule existed, or the folder ID is being saved to a different field than the one the file manager is reading from. Both are visible in Settings – check that the field name shown there matches the field your workflow rule is filling. For old records with no folder, edit and save the record again to trigger an On Edit rule, if you have set one up.
The widget does not show up in “Add Related List”
Check that its Type is set to Related List – a widget saved as Button or Web Tab will not show up there. Also make sure you are searching for the name you gave your own widget, not the extension’s name. The extension’s own widget will never appear in this list on custom modules – that is the whole reason this setup exists.
Renaming a record does not rename its folder
On modules you set up yourself, this is expected behaviour in the current version. It does work correctly on Leads, Contacts, Accounts and Deals.
What Happens When the Extension Updates
Your widget copy in Developer Space does not update on its own when A1 Zoho Solutions releases a new version of the extension. The extension itself updates automatically. But a widget you uploaded is just a file sitting in Developer Space – it is your organisation’s copy, and it stays exactly as you left it.
So after every extension update, go back to Setup › Developer Space › Widgets, open your widget, and upload the new zip file. Nothing else changes – same name, same type, same Index Page. Your related lists on each module stay exactly where they are.
Conclusion
Setting up the file manager on a custom module takes a bit of manual work, but it is a one-time job per module. Once the widget is uploaded and placed on the layout, it behaves exactly like the built-in file manager on Leads or Deals. Keep the prerequisites in order – module settings, then workflow rule, then widget – and most of the errors above will not even come up.
If you get stuck at any step, or want this set up across several custom modules at once, A1 Zoho Solutions can take care of the setup for you.
Frequently Asked Questions
Do I need to do this for every module in Zoho CRM?
No. Leads, Contacts, Accounts and Deals already have the file manager, because the extension was built for them. You only need this setup for custom modules, or standard modules the extension was not built for.
Why can’t the extension just be updated to cover my custom module automatically?
A Marketplace extension is packaged with a fixed list of modules at the time it is published. Custom modules are different for every organisation, so there is no way to build them into the extension ahead of time. This is a Zoho platform rule, not something specific to this extension.
What exact value should I put in the Index Page field?
/browser/index.html. Do not add app/ before it – that is the most common mistake people make here.
My file manager worked yesterday and shows an old version today. Why?
Zoho caches widget files in your browser. After uploading a new zip file, hard refresh the page with Ctrl + Shift + R to load the latest version.
Does the widget update automatically when the extension gets a new version?
No. You need to manually upload the new zip file to your widget in Developer Space after every update.
Can I use this same widget on more than one module?
Yes. But each module needs its own settings entry (its own folder ID field) and its own workflow rule. The widget file itself can be reused across modules once it is uploaded.
Walkthrough videos
Short videos covering installation, the setup screen and each feature in the file manager.